Thursday, 26 November 2015

Best Black Friday Deals 2015

Before we got married, my husband had zero clue a sale rack even existed.  Fast forward to now, and he is all about the bargain!  He's on all the deal forums and subscribes to all.the.emails.  I asked him to compile a list of the best Black Friday deals, and here they are, in case you want to get some Christmas shopping done early, or buy a little something something for yourself?

Tech stuff (these are his favourite, so there are the most deals listed for this category)


Appliances


Blu-rays, DVDs, Games


Kids/Baby


Other deals

Earn 4X Aeroplan Mile for every dollar spent on Costco.ca from November 26 to 30, 2015*.
Have you been searching for deals?  Make sure you share the ones you've found so we can all save (spend?!) some money this weekend!

Monday, 23 November 2015

Advent GIVING Box


advent calendar
I was thinking of a special advent calendar to make for my daughter this holiday season. I scoured the interweb trying to find something unique but I really couldn't find what I was looking for. When I stopped to think about, I realized I couldn't find what I was looking for because I didn't want yet another advent calendar that counts down the days until Christmas with a daily gift or treat. The idea of my daughter getting a daily present to count down the days until she gets even MORE presents didn't sit well with me. I want her to learn the importance of giving and not just receiving. So I decided to make an advent calendar that allows her to give daily. Each day starting December 1st, my daughter will remove the numbered tag and add one item that she would like to donate to the less fortunate into the box. It can be a nonperishable food item to give to the food bank, a new or very gently used toy/clothing item to donate to local shelter, a winter hat/mittens for the homeless etc. By the time December 24th rolls around, there will be 24 items to donate!!!
advent calendar
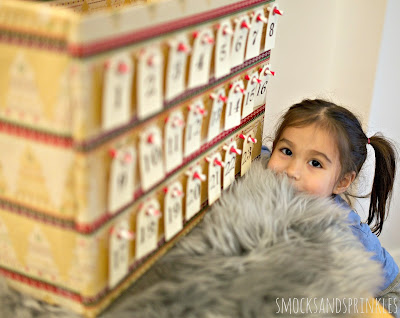
This is how I imagine the box looking as it fills up!
What a great way to celebrate this wonderful time of the year. I love that my daughter will spend each day thinking of ways to give to others. I can't wait to see the items she picks out (hopefully her baby brother won't end up in the box!).

Materials
  • Large cardboard box (I used a diaper box) or any large bin/container
  • Festive wrapping paper
  • 24 small tags (I found mine at a scrapbooking store, but you can easily make your own by cutting out small rectangles and hole punching the top)
  • Number stamps or number stickers (or a marker to write them by hand)
  • Paper straws
  • Scissors
  • Tape
  • Pen
  • Glue gun
  • Decorations (i.e. ribbon, stickers etc.)- optional

Instructions
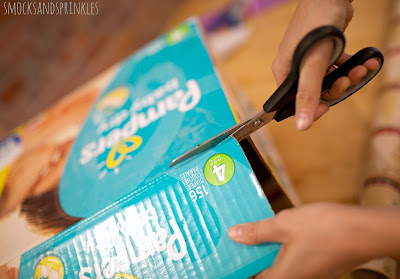
  1. Cut flaps off cardboard box.
    advent calendar
  2. Cover box with wrapping paper. 
    advent calendar
  3. Stamp numbers 1 to 24 onto paper tags.
    advent calendar
  4. Space out tags evenly on one side of the box (I made 3 rows of 8). Using a pen, mark the location of each tag.
    advent calendar
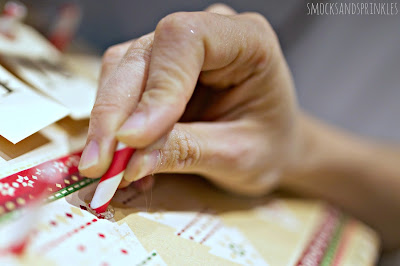
  5. Cut paper straws into 24 small pieces (approx. 3/4 of an inch).
    advent calendar

    advent calendar
  6. Using a hot glue gun, put a small amount of glue on one end of the straw piece and adhere to the marked pen spots on the box.
    advent calendar

    advent calendar
  7. Hang tags onto straw "hooks".
    advent calendar

    advent calendar
  8. Count down the days until Christmas by giving back daily:)
advent calendar
Just to sum it all up! Feel free to pin and share with others!

Alternative Calendar Ideas (if you really don't have the time to be so crafty, try using one of these ideas instead):
  • Paste the month of December (just cut it out of a calendar or print off the computer) onto one side of the box and cross out each day using a pen/marker, a bingo marker or with a cute sticker.
  • Adhere rows of string onto the box and use clothespins to clip on the days.
  • Buy 24 cheap plastic hooks from the dollar store to hang up each day.
  • Simply stick the days onto the box using tape.
  • Fringe sheets of paper, add numbers 1-24, rip off each number to count down the days (just like  flyers posted on bulletin boards with phone numbers to rip off).
Have you decided how you are going to count down the days until Christmas? Try making a Giving Box; after all, the gift of giving is the GREATEST gift of all<3
advent calendar

P.S.  I really should have let my daughter help decorate the Giving Box...don't be a crafty control freak like me and let your kid have some fun with it!


Sunday, 15 November 2015

3-ingredient Banana Pancakes


I'm always looking for tasty treats for my kids that aren't filled with processed sugar, so my sister told me about this really easy banana pancake recipe.  Three ingredients?!  Yes, please!  I chose to add cinnamon, too, so ours were 4-ingredient pancakes.  Simple to make, and I don't feel guilty about serving it as a baby's finger food!


I'll be honest, these don't last long in our house.  There's something about things that are mini-sized that makes them easier to eat in large batches, right?  And it totally doesn't count because it's mini.  And because these things are really only banana and egg!

raspberry garnish
She kept stealing all the food!  First pancakes, then raspberries.
paleo
I meant to save some to see how they would freeze.  You can see how that panned out.

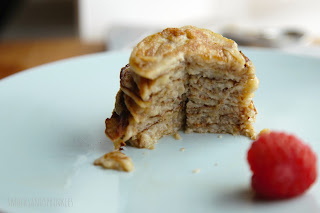
They're really moist, and the texture is in between a pancake and an omelette.  It's like the sweet centre of french toast!  You can make these the night before and warm them up for a few seconds in the microwave before you serve them.  They really don't need maple syrup, but if you're feeling a bit naughty, why not pour some (a lot?!) on?


Ingredients (for 15 silver dollar pancakes):
  • 1 banana
  • 1/8 tsp baking powder
  • 1 egg
  • cinnamon (optional)
Tip!  Add in nuts, seeds or chocolate chips to personalize your pancakes.

Method:
  1. Mash banana thoroughly using a fork.
    My daughter loves mashing bananas.
  2. Mix in baking powder and cinnamon.

  3. Beat in egg.  The mixture will be fairly thin, almost like a crepe batter.
  4. Heat pan over low heat.
  5. Oil pan and pour in batter in silver-dollar size rounds.

  6. Flip, when the pancake looks dry around the edges.  Be really careful, because it's a really soft pancake.  Fry for another minute or two to brown the other side.
  7. Eat.  Eat all the pancakes.  Let your child reach up and steal each one as it comes off the pan.  They're delicious!
    We ate them all.  Very quickly.  Didn't even save any for my son!
If you prefer a more fluffy pancake, just increase the amount of baking powder you put in.  I threw in about 1/4 tsp in another batch I made with 2 bananas and 1 egg, and those are the ones pictured with strawberries.

3-ingredient banana pancakes

paleo pancakes

Have you ever tried a recipe like this?  Let us know how long these pancakes last (or don't last!) in your house!

Saturday, 7 November 2015

Remembrance Day Wreath Craft

Remembrance Day Craft for Kids
My daughter has been very curious about why everyone is starting to wear a red poppy this time of year. She mentioned it to me after coming home from a subway ride with her grandma one day. It was a very good question. Since she is only 3 and a half years old, I initially struggled to explain the significance behind this symbolic flower. So I summed it up to her like this "Canada is a very beautiful country, and we are so lucky to live in this country. There are many men and women who worked very very hard to protect our country and to make our country safe to live in. It is because of these brave men and women that we are able to live in such a happy place like Canada. We wear a red poppy to say thank you to them." My daughter nodded her head and said "I am thankful for the men and women. I love Canada." We decided to honour the men and women who served our country by creating a Remembrance Day wreath to put up in our house. It's a really easy craft to create with your children and has a serious and important meaning.

Materials

  • Empty egg carton
  • Artificial grass"tile" or a green paper plate (to function as the wreath, I purchased the artificial grass from Dollarama)
  • Red nontoxic paint
  • Green nontoxic paint (if using a white paper plate for the wreath)
  • Paint brush/sponge
  • Black paper (or felt, pompoms, buttons etc.)
  • Scissors
  • Glue 
  • Glue gun


Instructions

  1. Cut out "poppies" from the egg cartons.
    Remembrance Day Craft for Kids
  2. Have your child paint them red and allow to dry.
    Remembrance Day Craft for Kids
    Little brother really wanted to help out with this craft!
  3. Cut out a wreath shape from the grass tile or paper plate (if using a white paper plate, feel free to paint it green).
    Remembrance Day Craft for Kids
    If using a round paper plate simply cut out a hole in the middle!
  4. Have your child glue black paper circles (or black felt, pompoms, buttons etc.) into the center of each painted poppy. If you want to keep things simple, just use black paint or a black marker to make the centers of the poppies.
  5. Using a glue gun, adhere the poppies around wreath (space out evenly).
    Remembrance Day Craft for Kids
  6. Hang proudly and take the time to remember.
    Remembrance Day Craft for Kids
    We will never forget the heroes who served our country and we are forever grateful.

Take a few minutes to talk about Remembrance Day with your child and please remember to share any Remembrance Day craft activities you have with us:)


Saturday, 31 October 2015

Build-a-Bear Birthday Party Review

So you know how you're always looking for interesting birthday party ideas, going on Facebook mommy threads to find out what everyone did for their birthdays and scouring Pinterest for themes?  Indoor play area birthdays are all the rage, but we recently attended a Build-A-Bear party and wanted to share about it, in case you wanted a different idea!


We got the invitation to our Build-A-Bear party via Evite, but you can also print paper ones.  Build-A-Bear provides different images for your invitations in case you want to use them.  When we arrived at the party, each child got a name tag, and I think they were also supposed to get a crown, but they didn't hand them out this time.  The brochure said that the bears are supposed to get a party hat, too?  We didn't miss them, though, because I'm sure Kiyomi would have taken hers off 2 minutes after receiving it, anyway.

Waiting to choose their animals

Our party leader introduced herself and had all the guests line up to choose their animal, out of a choice of 3 (brown bear, white bear, dog).  We asked about paying extra to upgrade to a different animal but were told we couldn't, since we were part of a party package.  I think this was a good thing, because you better believe we had our eye on the Darth Vader Bear, and I didn't realize until later that he costs almost $40!!  After that, I was gunning for the dog, but Kiyomi chose the white bear.  Womp womp womp.  But okay, this is her bear.  Not mine?


We did a fun march over to the stuffing area, where we played "I Spy" for a bit while the leader stuffed the bears one by one.  I think the best part for the kids was stepping on the pedal to get the machine to blow the stuffing into the bear.  I was impressed at how patient all the kids were while they waited for their turns, except for my girl who scooted her way to the front, haha.


After that, we lined up again for hearts.  This is obviously the most important part, because it brings your bear to life.  Fortunately, they weren't too busy in the store, so another staff member helped sew up the bears.  They were fast, so each bear took only a few minutes to stuff with a heart.  Kiyomi still talks about how she gave her bear a heart.  Awwww.


Then it was shower time!  Again, a little bit of waiting, but 2-3 kids could "wash" their bears at a time, so it was faster than before.  They took a little brush and combed the bear fur.  Very cute.  Then it was time to choose outfits.  I was impressed that they had around 5-10 different t-shirt choices, including Captain America, R2-D2, and some pretty fancy dress-up outfits!  A little more waiting while everyone chose, but more entertaining this time because we got to check out the outfits.  I think to ease the pain of not getting Darth Vader Bear, Kiyomi chose the R2-D2 t-shirt.  Her father was so proud.  Each bear also got 2 hair ribbons or a bowtie.


We marched over to another area for the Build-A-Bear ceremony, which involves the Build-A-Bear pledge about being #1 pals with your bear forever (i.e. until your bear gets too dirty, falls apart, or every parent's nightmare - gets lost!), and each bear got a birth certificate and bear condo (the official name for those cardboard boxes they put the bears in). I was super-impressed that they kept track of all the bears' and kids' names so they could put them on the birth certificates!

Look at the detail on this shirt!  So glad she chose it!

Our party leader was really great about remembering names, because she called the kids by name, even after they lost their nametags (of course).  I wish she had played more games with the kids to keep them entertained though, because we only did 2 rounds of "I Spy".  Most of the kids were old enough to wait patiently through all the steps, but I imagine this type of party would be rough for more active children.

Lots of waiting, but the kids were all really patient!

After our party, we moved to the mall food court where we had bagged lunches (in cute paper lunch bags decorated with stamps and colored by the birthday girl) and cupcakes.  Kiyomi loved the experience and was a goofball in the food court.

Still content, 1.5 hours later!

Build-A-Bear has different packages at various price points, depending on the number of accessories you want to include for each bear, but I think it's pretty reasonable, especially because the location, activity, and "loot bag" are all included.  I also think eating in the food course is an amazing idea, because it takes the pressure off of needing to have an elaborate food spread!  :)  The best part is that it's really easy in terms of prep and work involved.  The party ran around 1.5 hrs, and my one-year-old managed to hang out in the store the entire time.  Many Build-A-Bear stores are located in malls, so you can always take the little ones for a walk, or do a little shopping while the kids party.  Most of the parents stuck around, but they didn't really need to.


Overall, we enjoyed the party and the kids seemed to love their bears.  I wouldn't recommend it for really small children or kids with a short attention span, as there's a lot of waiting and lining up involved.  Otherwise, I think kids of all ages (read: husbands who are into Star Wars) would have a great time!  Kiyomi really likes her bear, but he didn't make the cut for bedtime lovey.  Maybe in time?

Have you ever been to a Build-A-Bear party?  Or have other ideas about great birthday party venues?  We probably have at least another 10 years of birthday party planning to do, so we'd love to hear your experiences!
Related Posts Plugin for WordPress, Blogger...