Showing posts with label felt. Show all posts

Thursday, 2 June 2016

Easy & Fun Sock Donut Craft

In the words of Homer Simpson, "Mmm...donuts!"  They're so tasty and have gone so gourmet lately!  When I saw these sock donuts at my local drop-in program, I knew I had to try making them at home.  Cue today, when my younger son took an amazingly long nap, so my daughter and I had some crafty bonding time.


All you need are socks, and whatever decorations you want to put on top!  It was so fun to decorate these sock donuts and it was so good for my daughter's fine motor skills.  She cut, glued, rolled and assembled her own donuts and it kept us busy for well over an hour!


Materials:
  • socks
  • scissors
  • glue (we used white glue and hot glue)
  • decorations - felt, pipe cleaners, beads, string, fun foam, etc.
 
Method:
  1. Take a sock and cut the toe open, so the sock forms a tube.
  2. Roll the sock on itself until you get a donut shape.  Adhere the ends with a little glue so it doesn't unroll.


  3. Cut out and glue different decorations on top.  Be careful to use strong glue if you have a little one and choose to decorate with beads!

  4. Let them dry!  You can use them as food items in your play kitchen, or sing this donut song with them!  You can also use them for the Five Little Monkeys song, replacing "monkeys" with donuts.
We hope you have lots of fun making and decorating these sock donuts and playing with them! Ours make me want to get a cronut!


Sunday, 13 March 2016

Easter Bunny Butt Decor

I have a confession. I am obsessed with bunny butts. Those adorable fluffy cotton balls melt my heart into a puddle of mush. There is nothing like Peter Rabbit's behind...well except for David Beckham's tushie but that's a whole other blog post. The next 3 posts leading up to Easter are dedicated to bunny butts. If you are thinking about hosting a kid's Easter party, bunny butt decor is so easy and cute to whip together.  Here are some ideas to get you started.

Bunny Butt Napkin Rings


Materials 

  • toilet paper rolls
  • felt (your choice of colour)
  • foam sheets (I happened to find foam bunny rabbit shapes at dollarama!)
  • pom poms
  • round make-up sponges 
  • glue (you can use regular glue but I prefer a hot glue gun since I can be very inpatient)
  • scissors
  • tape


Instructions

  1. Cut toilet paper roll in half
  2. Cut felt into a wide strip to cover paper roll. Tape or glue into place.
  3. Glue foam bunny ears to back of make-up sponge and glue pom pom onto the front. Glue completed bunny onto the napkin ring (be sure to cover the felt seam).
  4. Insert napkins and wow your little guests!

yes, that's face paint on my daughter again.

Bunny Butt Place Cards
Glue completed bunny onto a place card (you can make your own by folding rectangular pieces of card stock or stiff paper in half or you can buy a bunch at the dollar store and save yourself the hassle).

Bunny Butt Straws
Glue completed bunny onto a paper straw. You can glue another round make-up sponge or a piece of circular paper as a backing.

Bunny Butt Cups
Cut out foam bunny ears and glue onto cup. Glue on pom pom.

I can't handle the cuteness. I'm pretty sure I was wayyyy more excited than my daughter to drink through a bunny butt straw. Do you have a similar obsession? Please share with us (tag us on instagram @smocksandsprinkles) and get started on your bunny butt decor! Hoppy crafting:)

Friday, 12 June 2015

Super-quick Father's Day Coffee Cozy Craft

felt coffee cozy
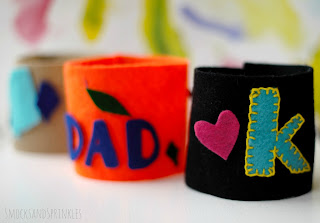
When your little one has the attention span of a goldfish and you want to do a craft, you have to be fast.  Today's felt coffee cup cozy craft (say that five times fast!) takes no time at all, and your toddler can do most of it independently!  It's totally customizable, and you can make it as complicated or as simple as you like.  I let my almost 3-year-old do whatever she wanted with scissors, felt, and glue, and you can see the results.  I can't say she has the most amazing colour aesthetic, but she had fun, and it's a practical gift that won't clutter up a desk.

felt coffee cozy

Materials:
  • felt
  • scissors
  • fabric or other strong craft glue (or even hot glue if you want to do the gluing)
felt coffee cozy
Method:
  1. Cut out a long rectangle for the base of the cozy.  Mine measured 8 cm x 23 cm (this measurement will change depending on the size of the mug you want the cozy to fit).
  2. Let your little one cut out shapes out of felt. 
    felt coffee cozy
  3. Put some glue out on a plate, or let your child squeeze glue onto the felt shapes and adhere to the base.
    felt coffee cozy

    felt coffee cozy
  4. Grab your cold coffee and throw your feet up here.  You get a 5-minute break while your child cuts and pastes!
  5. Once all the shapes have been stuck down, glue the ends of the base together to form a loop.  You can wrap the cozy around your mug so you know what size to make it.
    felt coffee cozy

    felt coffee cozy

Tip!  If you want your cozy to be somewhat colour-coordinated, limit the colours of felt you put out.


felt coffee cozy

felt coffee cozy

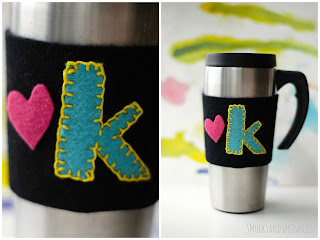
Okay, and because I just can't leave some things alone, I decided I wanted to make my own cup cozy.  It's the same idea as the one above, but I drew and cut out templates from paper first and then cut them out of felt.  I also decided I'd blanket-stitch the shapes at 1 am because I'm crazy for crafts.  And alliteration, apparently.  It's a problem.  But it was worth it!  I love blanket stitching!  Check out this link if you want to learn how to blanket stitch.

felt coffee cozy
Tip!  To get nice lettering, you can print out the words in the font you want and use the paper as your template.

felt coffee cozy
Are you planning on buying or making your Father's Day gift? Get started this weekend so you have plenty of time to prepare! :)
Related Posts Plugin for WordPress, Blogger...