Showing posts with label hairband. Show all posts

Saturday, 5 March 2016

DIY Bowties for your Little Guy

DIY bowtie

Little boys in bowties are the bomb diggity.  Seriously, can you resist them when they look like this?!

little boy's bowtie

Bowties are actually deceptively simple to make!  You can use hot glue to hold it together if you're not going to use it much, or sew it for longevity.  Pair it with some suspenders, a cute button up shirt, and maybe some horn-rimmed glasses?  Save this tutorial for your hipster teenager's prom, too!  You can wear the bowtie by attaching straps, safety-pinning, buttoning etc.  Pssst...if you attach it to a headband base (check out our headband tutorial for measurements in step 13), you can double it as a cute bow hairband, or put it on a clip as a cute hairbow!

bow tutorial

Materials:
  • fabric of your choice
  • hot glue gun & sticks or sewing needle with matching thread 
  • velcro, clip, button or safety pin

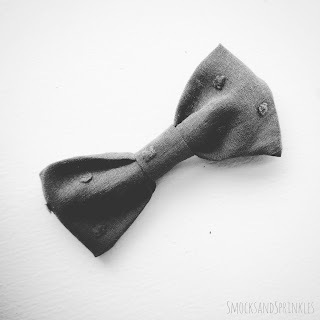
Tip!  Use a lightweight cotton material for a crisp, clean look (like my gray bowtie) and easy assembly.  The striped bowtie is made of stretch jersey and was thick and more slouchy looking.  It was also harder to work with when assembling.

Method:
  1. Cut your fabric into 3 pieces as indicated in the image (these measurements are for a toddler bowtie - see the end for the man-size measurements).
    bowtie tutorial
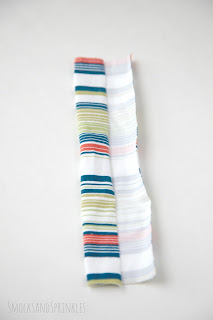
  2. Take the rectangle #1.  This will form the main bow.  Fold one side into the middle.
    bowtie tutorial
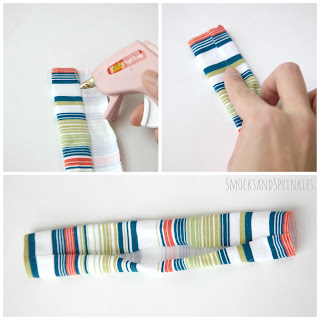
  3. Put a small line of glue at the top and bottom.  Fold the other side in and press into the glue.  You'll notice that the middle is left open.
    bowtie tutorial
  4. Put one dot of glue in the centre and adhere the fabric.
    DIY bowtie
  5. Fold both ends into the centre and put dots of glue to adhere them, overlapping them by about 1/4".  This becomes the main bow part.  Set this aside while you work with the other fabric pieces.
    boy's bowtie
  6. Take the smallest rectangle (#3).  Run a line of glue on the right side (the front, nice side) of the fabric.
    bowtie tutorial
  7. Fold the fabric in half on top of the glue.  Wait a few seconds for the glue to dry.
    bowtie tutorial
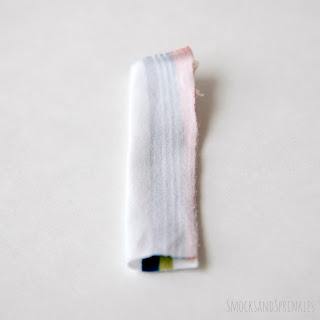
  8. Flip this fabric tube inside out.  This will be the middle of your bow.
    bowtie tutorial
  9. Take this piece and wrap it around the middle of your larger bow piece and glue it, scrunching the bow piece.  Hide the raw edges of the bow inside this middle piece.
  10. Optional: I "unrolled" part of the striped bow to make it a little fluffier.  I left the gray one as is.  You can play around with it.
    DIY bowtie

    bowtie tutorial
  11. When you're happy with the creases and bunching in your bow, use hot glue to preserve all the folds.
  12. You can hot glue this bow to a clip, or you can do what I did and attach a safety pin because I'm lazy and didn't want to add any more steps!  I just slipped the pin underneath the center piece and glued it.
    DIY bowtie
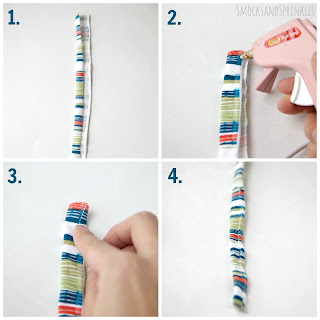
  13. You could also attach it to a strap.  To make the strap, I took the long, skinny fabric piece (#2) and folded in one side.  Applying hot glue in small sections, I folded the other side on top until I had a tube.
    Boy's bowtie
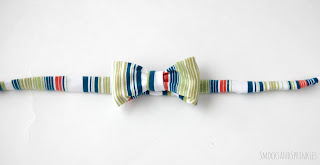
  14. Adhere the bow to the center of the strip using some more hot glue, or string the strip through the middle bow piece.
    boy's bowtie
  15. Attach either a button or velcro (I recommend sewing buttons and velcro) to the ends of the strip so you can close it around your toddler's neck.  If the size isn't quite right, cut the strip to the right size.  If this step is too difficult, you can always tie it at the back, but you'll need to make it slightly longer.
    DIY bowtie
You can also sew a button directly to the bow, so that you can button it straight on a shirt.  Voila, you have the most dapper gentleman you've ever seen!

DIY Bowtie

One of our readers requested measurements for a man-sized bowtie, and I thought it was a great idea so I crafted a large-size one.  She said she wanted to make matching bowties for all the men in her life!  Can you imagine how cute that would be?!  The measurement for the man-size large bow piece is 11" x 4" (21.5cm x 10cm).  The small center piece is 1.6" x 2" (4 cm x 5 cm).  Follow the same directions!  And I say just safety pin it on the big boy.  He can handle himself around pins.  Hopefully?

Be sure to tag us on Instagram (@smocksandsprinkles) so we can see all the cute gentlemen in your life, sporting these easy bowties!

bowtie tutorial
Pin me for later!

Wednesday, 26 August 2015

Cute Knotted Headband - Fast, easy, no-sew!

DIY knotted hairband
Ever since I saw these knotted headbands, I've been meaning to make my own.  I mean, how hard can it be?  Cut a strip of fabric and knot it, right?  YES!  It's really that easy.  Even easier than the flower headband.  I'm serious, I made my first experimental one in less than 5 minutes, and I wasn't even sure what I was doing!

knotted headband tutorial

Materials:
  • jersey, knitted fabric, or an old T-shirt
  • scissors
  • headband pattern (you can download it here)

knotted headband tutorial
Method:
  1. Cut a strip of fabric 22" x 4" long.  Make sure the stretch goes horizontally, so the headband will stretch.
  2. Print out the pattern.  Or don't.  This headband is so easy, you can probably wing it!
  3. Fold your fabric strip in half.  Place the template with the pointed edge towards the ends.  Pin and cut the fabric along the solid lines.
    knotted headband tutorial

    knotted headband tutorial
    Look at this horrible cutting.  And the headband still turned out great!  Told you it's easy!
  4. Tie the fabric in a cute knot, incorporating the skinniest part of the fabric into the knot and voila, you are a headband master!

Tip!  You can adjust the size of the headband as your baby grows by adjusting the placement of the knot.

knotted headband tutorial

You'll be surprised at how easy this headband is to make, and how cute it looks on your little one.  You still have time to make one for the first day of school.  And make sure to share photos of your creations!

DIY knotted hairband

Saturday, 2 May 2015

Easy Flower Headband

fabric flower hairband

Time is a precious commodity when you have children, so today I'll be showing you how to make an incredibly fast and easy flower hairband.  It takes less than 15 minutes and requires no sewing.  And it is just so cute!  Admittedly, I wish I had made a bunch of these when my daughter was younger, because they're nice and soft in case you want to put them on your newborn (can you say, "newborn photoshoot"?).

fabric flower headband

Note: The number of cut out flowers you need will depend on the thickness of the knit fabric that you use.  The purple fabric you see in the photos is a thinner, slinkier jersey knit, while the dark gray is slightly thicker and stiffer.  I used 16 cut out flowers in the purple, and only 10 in the gray fabric.  You will also need fewer flowers if your finished flower size is smaller.

Tip!  Have a t-shirt you don't wear anymore?  Re-purpose it into this cute headband!

fabric flower hairband

Materials
  • knit fabric like a jersey - quantity will depend on how large you want your flower to be, and on how "stiff" your fabric is, but you won't need more than 40 cm x 40 cm or so
  • hot glue gun, glue sticks for the gun
  • felt (preferably the same colour as your fabric)
  • scissors
  • a few pins
  • paper and pencil

Tip!  If you're going to get serious about crafting with fabric, consider reserving a special set of scissors just for fabric (and keep them away from paper, hair, and anything else your kids will try to use them on!).  This will keep them nice and sharp.


fabric flower hairband


Method
  1. Plug in your hot glue gun now, so you can let it get hot!  It's like preheating your oven, but for crafting! 
  2. Draw out a flower onto a piece of paper, roughly the size you want your finished fabric flower to be.  Cut this flower template out.  You can draw 4 or 5 petals on your flower.  I did 5 petals, and the diameter of my flower was about 7cm across. 
  3. Cut 10-16 squares of knit fabric to fit your flower.  (I may have cheated and cut a long strip of fabric about 7.5 cm wide, which I folded back and forth to layer the fabric and cut many flowers at once.)
  4. Take a stack of 4-5 squares and pin your flower template to the top.  Take your scissors and cut around the flower.  It doesn't have to be neat, but try to use slow, long strokes to make the edges smooth.
    easy fast hairband tutorial
  5. Repeat until you've cut out all your fabric flowers.  Don't panic if your flowers are uneven or slight wonky. Everything will look amazing at the end, I promise! 
  6. Fold each flower into quarters (into half, and then into half again). You can see what they look like in the photos below.
  7. Cut 2 circles out of your felt, slightly smaller than the flower.
  8. Squeeze a dot of glue into the centre of the felt.  Take each folded flower and glue the corner down.  Your first layer should have 4 flowers.
    fast easy hairband tutorial

    fast easy hairband tutorial

    fast easy hairband tutorial

  9. Take another 4 flowers and glue the corners to the middle of the felt, but stagger this layer so that you're covering the cracks between the flowers in the first layer.  Mathematically speaking, it's a 45 degree rotation.

    fast easy hairband tutorial

  10. I used my glue gun to squish the centre corners periodically, to make sure the flowers really adhered well.
    fast easy hairband tutorial
  11. Keep going until you have one or two flowers left.  Roll these flowers and attach them to the centre of your large flower.
    fast easy hairband tutorial

    fast easy hairband tutorial

    fast easy hairband tutorial
  12. You can go back and fluff the flower, but voila, you have a gorgeous flower.  Aren't you a little bit impressed with your skills?
  13. Cut a long piece of knit fabric for the headband.  You can wrap a long piece of fabric around your little one's head to figure out how long to make it.  Mine measured 37 cm long by 5 cm wide.
  14. Run a line of glue along one end and attach the other end, overlapping the fabric by about 1 cm.
    fast easy hairband tutorial

    fast easy hairband tutorial
  15. Glue your large flower right over this seam, and glue the other felt circle underneath, so the dried glue doesn't scratch your little one's head.
  16. Give your hairband a tug to stretch the fabric.
    fast easy hairband tutorial

    fast easy hairband tutorial
Tip!  Glue a cute button or jewel in the centre of the flower to make it even fancier!


Tip!  Make the flower out of felt or chiffon for a different look.

I hope you have fun creating these headbands in lots of different colours for your little one!  Let us know how they turn out, or if you have any questions or suggestions for making these even easier!

Fast easy hairband

Related Posts Plugin for WordPress, Blogger...