Wednesday, 26 August 2015

Cute Knotted Headband - Fast, easy, no-sew!

DIY knotted hairband
Ever since I saw these knotted headbands, I've been meaning to make my own.  I mean, how hard can it be?  Cut a strip of fabric and knot it, right?  YES!  It's really that easy.  Even easier than the flower headband.  I'm serious, I made my first experimental one in less than 5 minutes, and I wasn't even sure what I was doing!

knotted headband tutorial

Materials:
  • jersey, knitted fabric, or an old T-shirt
  • scissors
  • headband pattern (you can download it here)

knotted headband tutorial
Method:
  1. Cut a strip of fabric 22" x 4" long.  Make sure the stretch goes horizontally, so the headband will stretch.
  2. Print out the pattern.  Or don't.  This headband is so easy, you can probably wing it!
  3. Fold your fabric strip in half.  Place the template with the pointed edge towards the ends.  Pin and cut the fabric along the solid lines.
    knotted headband tutorial

    knotted headband tutorial
    Look at this horrible cutting.  And the headband still turned out great!  Told you it's easy!
  4. Tie the fabric in a cute knot, incorporating the skinniest part of the fabric into the knot and voila, you are a headband master!

Tip!  You can adjust the size of the headband as your baby grows by adjusting the placement of the knot.

knotted headband tutorial

You'll be surprised at how easy this headband is to make, and how cute it looks on your little one.  You still have time to make one for the first day of school.  And make sure to share photos of your creations!

DIY knotted hairband

Sunday, 23 August 2015

Recipe Fail? Chocolate Lentil Cookies

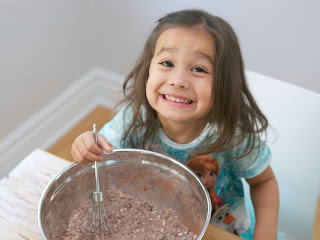
I'm still deciding whether I failed or won. Really not sure yet. So my daughter asked if we could bake some chocolate cookies and I said yes (while secretly thinking about what healthy ingredients I would sneak in...muahahahaha). I scoured my pantry and pulled out a can of lentils. Chocolate lentil cookies could work! Or so I thought. We came up with a recipe that I thought would work out.
She's pretty excited to bake!
The end result? My daughter truly loves them but no one else does. My husband called them "brown styrofoam". I myself am unsure and I have very healthy tastebuds and will pretty much eat anything. I tried to save them by freezing them and turning them into Yonanas ice cream. Surely Yonanas can save the day! The end result? My daughter loved the "chocolate ice cream". I'm still unsure. Tastes a whole lot like cold clumpy chocolate oatmeal. So what exactly is the point of this post since my recipe failed (to everyone except my daughter)? We are not perfect. Skimming through our blog the other day made me realize that we may come off like we are perfect moms...annoyingly perfect. But that's the beauty of a blog and even Facebook. You have time to edit your work and post the perfect pictures. We don't have that luxury in real life. Real life throws curve balls at us all the time and we do what we can to survive. Like today, I am at home with two sick kids and you better believe there will be some screen time and pizza delivery! Here is the imperfect recipe for all those who like brown styrofoam or have kids that eat anything. Any ideas to improve it? Butter perhaps? ;)

Ingredients
  • 2 cups oats
  • 1 cup spelt flour
  • 1/2 cup cocoa powder
  • 1 tsp baking powder
  • 1 tsp baking soda
  • 1/2 tsp salt
  • 1 can (540 ml) lentils 
    • drained and rinsed
  • 5 pitted medjool dates 
  • 2 very ripe bananas 
  • 1 egg
  • 1/4 cup grape seed oil
  • 2 tsp pure vanilla extract
Method
  1. Preheat oven to 350 F.
  2. Combine dry ingredients in a large bowl.
  3. Combine lentils, dates, bananas, egg, and vanilla extract in a large bowl. Blend until smooth.
    She had so much fun baking...that's what really matters, right?
  4. Add wet ingredients to dry ingredients. Stir until just combined.
  5. Use a tablespoon or a small ice cream scoop to scoop out balls of dough on a parchment paper lined baking pan. Cover the bottom of a drinking glass with parchment paper and use to flatten the balls down.
  6. Bake for approximately 20 minutes.
  7. Cool on a wire rack and enjoy?
Going to attempt to tweak this recipe next week to see if I can come up with a culinary delight! I will be sure to share:) Now back to my imperfect day of parenting.
They looked so delicious!
Update! I decided I may have won. My daughter loved the cookies and requested them for breakfast the next morning. My 1-year-old son also devoured them (frozen as a teething cookie). They are all gone and she has asked to bake them again! Be warned that my kids are NOT the norm ;) Oh, and my husband still refuses to touch them with a 10-foot pole. 


Tuesday, 18 August 2015

Mason Jar Gift Sets

We just love mason jars. They are just so incredibly versatile and always look good. They look good stuffed with pretty much anything: food, flowers, utensils, pencil crayons, craft supplies etc. They also make the most adorable gift sets! Mason jars are really inexpensive and you can even find them at dollar stores.

Tip! Adding a pretty piece of fabric, ribbon and gift tag makes the gift set extra cute!

Here are some of the cutest mason jar gift sets:
  1. Feel Better Gift Set. Not only does this mason jar set look super adorable, it will also make you into the world's greatest friend! Seriously, how thoughtful is this gift? So simple but so sweet. This one was made for someone fighting a bad cold and in desperate need for a little TLC. 
    Fill one jar with anything cold/flu related and the other jar with some homemade soup. We made a hearty lentil soup but any soup will do. If you prefer, you can create a dry layered soup recipe instead. Just remember to include the instructions on the label.

    Content ideas
    • Soup - fresh, or a dry, layered soup
    • Cold meds - NeoCitran, Cold FX, your own natural remedies
    • Hand sanitizer, Boogie wipes
    • Chapstick
    • Throat lozenges
    • Essential oils
    • Tea
    • Tissue
    • Small novel, crosswords, sudoku puzzles
    • Fuzzy socks 
    • Cream for a dry nose

  2. Baking Gift Set. Great for a house warming or bridal shower gift. Fill one jar with baking essentials or decorative items  and the other with the layered ingredients for a baked good recipe.

  3. Content ideas
    • Measuring spoons or cups
    • Whisk, spatula, pastry brush, wooden spoon
    • Flavoured extracts (vanilla, almond, maple, etc.)
    • Sprinkles
    • Icing, piped frosting tips
    • Cookie cutters
    • Muffin/cupcake cups/wrappers
    • Cupcake toppers
    • Recipe cards
    • Dried fruits/nuts
    • Layered cookie recipe, muffin/bread recipe etc. 
    • Oven mitts

  4. High Tea Gift Set.
    Who doesn't love high tea? Help someone recreate the high tea experience in their own home.
    Fill one jar with different types of tea accessories and one jar layered with the ingredients for a scone recipe. You can also include a jar of their favourite flavour of jam/jelly, or include a cute teacup/teapot with the mason jars.

    Content ideas
    • Tea bags, blooming tea
    • Tea strainer/tea ball
    • Sugar cubes, rock sugar
    • Small jam/jelly jar, honey
    • Teaspoons
    • Petit fours, macarons
    • Layered scone recipe like this one for cherry oat scones

  5. Labour Gift Set. This is perfect for all your mama-to-be pals out there. Great gift idea for a baby shower too!
    Fill one jar with labour essentials and another jar with their favourite snacks. Add in a straw so they can use the mason jar as a drinking glass.

    Content ideas
    • Lip balm
    • Hair elastics
    • Face wipes
    • kleenex
    • Hand sanitizer/lotion
    • deoderant
    • toothbrush, toothpaste, dental floss
    • shampoo/conditioner
    • Tic tacs, mints
    • Essential oils for aromatherapy
    • iPod with a soothing music mix or hypnobirthing tracks
    • Small massage tool
    • Stress ball
    • Snacks (granola bars, nuts, fruit bars, etc.)
    • Straw
  6. Newborn Survival Gift Set. Fill one jar with anything that can help a new mom, and another with essentials for a newborn.

    Content ideas for mom's jar
    • Teas or cookies for boosting breastmilk
    • Nipple cream, breastpads 
    • Hair elastics
    • Feminine products
    • Snacks (granola bars, trail mix, etc.)
    • Gift cards for a take-out restaurant, diaper service etc.

    Content ideas for baby's jar
    • Pacifiers, rattles, other toys
    • Diapers, diaper cream
    • Washcloths, burp cloths, bibs
    • Onesie, hat, socks, booties
    • Nasal aspirator, nail clipper
    • Hair accessories (hairband, clips)

  7. Baby Bath Gift Set. Another great idea for a baby shower gift or a newborn.
    Fill one jar with baby bath essentials and the other with colourful washcloths (this would look really pretty layered or you can roll the towels up into little balls and secure with a rubber band).

    Content ideas
    • Bath wash, soap, shampoo
    • Bath toys
    • Bath thermometer
    • Washcloths, bath mitt
    • Brush
    • Lotion, massage oil, diaper cream
    • Toothbrush
  8. I Love You Gift Set. Perfect for Valentine's Day, a birthday or just because! Fill one jar with little notes stating all the different reasons you adore and love the person. Take some time to reminisce and write down memorable moments that stand out in your mind. Fill the other with their favourite things...snacks, candy, gum, gift cards, lip balm etc.  You can even print out photos in a cute, small size to mix in with the notes!

    Content ideas
    • Love notes
    • Romantic quotes
    • Photos
    • Your significant other's favourite things!

  9. Travel Gift Set. For all your travel-obsessed friends (wherever they are, I am jealous). Fill one jar with travel essentials and the other jar with their favourite packaged snacks (in case they feel like munching on something on or between flights).

    Content ideas
    • Travel-size toiletries (shampoo/conditioner, lotion, face spray, etc.)
    • Slippers or socks for the plane/hotel room
    • Ear plugs
    • Maps of the travel location
    • Country's currency

  10. Crafty Gift Set. For all your artiste friends!
    Fill one with some small paintbrushes and paint. The mason jar becomes the perfect water container for painting on the go!  You can make different jars for different types of crafts: Paper crafting, knitting/crocheting, sewing.  The possibilities are endless! You can also easily create a kids arts and crafts kid set with any kid-friendly art materials.

    Content ideas
    • Painting: paintbrushes, tubes of paint, small palette, paper/canvas swatch
    • Knitting/Crocheting: yarn, patterns, needles, buttons, stitch markers
    • Sewing/Embroidery: thread, embroidery floss, needles, fabric swatches, buttons, zippers, velcro
    • Card-making/Paper crafting: stamp pads, stamps, embellishments/ephemera, stickers, cardstock, punches, ribbon, adhesive
    • Modelling Clay: clay, clay tools like cookie cutters, small rolling pin
    • Kid's Crafts: safety scissors, glitter, markers, colouring pages, kid's stamps & stamp pads, glue stick
  11. Ooh La La Gift Set. Perfect for a bachelorette party or bridal shower. Fill one jar with a variety of cute undies and another jar with candles and/or stuff to pamper the bride-to-be. Expect a thank-you note from the gift recipient's partner!  ;)

    Content ideas
    • Underwear, bras, garter
    • Nail polish, nail file, toe separator
    • Lotion, massage oil
    • Face masks (cloth, mud, etc.)
    • Bath scrub
    • Candles
    • Beauty items: lip gloss, perfume rollerball, etc.

  12. Sporty Gift Set.  Fill the jars with sport memorabilia and the other one with sports equipment. 

    Content ideas
    • Trading cards
    • Game schedules
    • Tickets to a game
    • Golf: balls and tees, ball markers, divot tool, glove
    • Ping pong balls, badminton birdies, darts, etc.
Tip!  Use any of these ideas, but pack it in a different container to suit your occasion!  You could put the travel gift set in a cute travel toiletry bag, or the high tea gift set in a teapot!  The sky is the limit!

You can pretty much come up with a mason jar gift set for any occasion. Please let us know if you come up with your own unique gift set. Happy mason-jarring!
    Pin me for later!

Wednesday, 12 August 2015

Yogurt drops for teething

It's that time again.  That time when the grumpy teething monster rears its ugly head!  Our little ones have teeth coming in, and it is making them cranky!  We're always on the lookout for things to ease their pain, and these yogurt drops are fast, easy, and perfect for the job.  Now, if only Sophie the Giraffe came in yogurt form!

Ingredients:
  • 1/2 cup yogurt (greek or strained works better for getting "plumper" drops, but we used plain organic and it worked but the drops were thinner)
  • fruit or veggie addition of your choice (we made 2 batches: one with 1/2 avocado and one with 1/2 banana) 
  • parchment paper, cookie sheet
Tip!  Consider making these drops with your favourite smoothie or other baby food.  You can really do it with any liquid!


Method:
  1. Mash ingredients together with a fork, or blend together for a smooth consistency.
  2. Drop spoonfuls of the mixture onto a parchment lined cookie sheet.  The smaller you make them, the faster they melt, so keep that in mind! If you're type A like us you can use a squeeze bottle or ziplock bag with the edge cut off to form perfect little circles.
  3. Place cookie sheet in freezer until drops set.
  4. Remove drops and enjoy!  Store these in the freezer until a teething emergency beckons.
We had to try these out, too, and they're delicious! Our little ones devoured these, although the cold texture shocked them at first!
Get in my belly!
Let us know how your little one enjoys them!  Also let us know what your best teething tips are!  We need the help....Help!
pin me!

Saturday, 8 August 2015

Baby-centered Parenting

parenting
I carry my son in a carrier, we co-sleep at night and he nurses on demand. Strollers, cribs and bottles are completely foreign to him. No, I'm not an attachment-style parent. I am a baby-centered parent. Baby-centered parenting captures the unique qualities of each child.
parenting
I followed my son's lead from the day he was born. Through careful observation, trial and error and allowing myself to get to know him, I have learned his likes and dislikes. I used strollers, bottles and cribs with my first born. Why such vastly different methods of parenting? Because my daughter is a different child with her own set of likes and dislikes. She needed her own space and never slept well beside me as an infant. She loved her crib. She took to a bottle easily and switched between breast and bottle feeding without difficulty. She preferred a stroller over a carrier and enjoyed being pushed for long walks. The exact opposite of my son.
parenting
Parents often worry that they will spoil their baby if they carry them too much or cuddle them to sleep. I get scolded by family members who are adamant that I am "spoiling" my son by nursing him too frequently and co-sleeping with him. They claim that he has developed bad habits and I will nurse him forever and he will never leave my bed. The reality is that it is NOT forever. One day, in the near future, my son will grow up and I will miss these early years where I had the opportunity to cuddle with him in bed and nurse him. I can already see huge changes in him. I used to have to go to bed with him at night and there was no way I could escape; he would sense my every movement and it's like we were totally in-sync. Remarkably, one night he decided he didn't need to be so close to me and rolled away. And now I can put him to bed and leave him to sleep. He did this on his own schedule without any sleep training. Some babies take well to sleep training, others don't. My son definitely did not. By following his lead instead of adhering to sleep schedules posted on the internet, I dropped all expectations and was able to take a more relaxed approach to parenting.
parenting
Each child is as unique as a fingerprint or a single snowflake. Only you, the parent, can learn exactly what your child needs to thrive. You are the expert. Not the books you are reading, not the countless family and friends that give you advice.  Not even Dr. Sears. No one knows your child as well as you do.
parenting
Here are some suggestions for how you can incorporate baby-centered parenting into your life:
  • You know your baby best.  Listen respectfully to advice, read books and get information, but ultimately, trust your gut!
  • Learn and track when your baby goes down easiest for naps/bedtime, when they are the hungriest for meals/snacks, and what calms them before bed.  Follow their cues to create an individualized routine. 
  • Try baby-led weaning.  Allow your child to choose food and feed themselves (within reason, of course!) and see how they eat when they're doing it independently.
  • Use baby sign to help you and your baby communicate.  It can be faster and clearer than using spoken language, and can help you to understand and respond to your baby's needs.
  • If you find you're busy, try scheduling some intentional one-on-one time with baby to observe and bond.
  • Try elimination communication and really get to know your baby!   We don't mean the potty-training part necessarily, but the part where you really seek to observe baby's elimination cues.
Things to keep in mind:
  • Keep in mind that this is a short period of time!  Co-sleeping, nursing, etc. don't last forever.
  • Safety first.  Educate yourself so you know what's safe and what's not for baby.  
  • Babies and kids thrive on routine. Just because you're following your baby's lead, doesn't mean you shouldn't provide structure.
  • Know when to ask for help if you need a break. Don't forget to take care of yourself:)
    parenting
What do you think of baby-centred parenting? How would you describe your parenting style? Let's share our expertise so we can figure out this crazy parenting gig together!

Wednesday, 5 August 2015

Chocolate Pudding Series | Decadent Chocolate Coffee Pudding

chocolate pudding recipe
Sometimes it's okay to indulge, right?  We're wrapping up our chocolate pudding series with a recipe that's delectable!  This chocolate pudding is rich, creamy and smooth.  It's probably the most labour-intensive of our series, but worth it if you want to indulge in a guilty chocolate pleasure!  We adapted the recipe based off of one from The Kitchn, and added coffee for a grown-up flavour.

chocolate pudding recipe
Please pretend there is sugar in this photo.

Ingredients (yields 4 servings):
  • 3 tbsp cocoa
  • 2 tbsp cornstarch
  • pinch of salt
  • 3/4 cup heavy cream (oh yeah!)
  • 2 egg yolks
  • 1 cup milk
  • 1/4 cup coffee
  • 1/4 cup sugar
  • 1/4 cup chocolate chips (approx 50 g)
  • 1/2 tsp vanilla extract
chocolate pudding recipe

Tip!  Use up the egg whites tomorrow morning in an omelette with spinach and cheese.  Mmmmm!


Method:
  1. Mix dry ingredients (cocoa, cornstarch, salt) in a large, heat-proof bowl.
    Chocolate pudding recipe

    chocolate pudding recipe
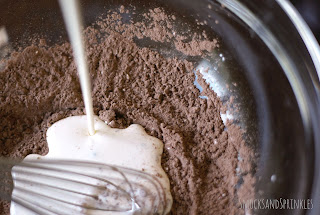
  2. Add in the cream and whisk until mixture is thick and smooth (almost like chocolate mousse).
    chocolate pudding recipe

    chocolate pudding recipe
  3. Drop in your egg yolks and whisk again until smooth.  Set this aside.
    chocolate pudding recipe

  4. In a saucepan, heat up your milk, coffee and sugar.  No need to boil or anything, it's just to dissolve the sugar.
  5. Once sugar is dissolved and milk is warm, pour about half of the milk mixture into the bowl with the other ingredients, stirring as you add it.
    chocolate pudding recipe

  6. Whisk until smooth again, and then pour this mixture back into the saucepan.
    chocolate pudding recipe
    Please excuse the terrible lighting in my kitchen!
  7. Bring your lovely chocolate pudding to a boil to thicken it.  You'll see it bubbling.  Let it boil for approximately 2 minutes while mixing continuously, and then remove it from the heat.  Do not leave the mixture unattended on the heat, even if your toddler decides to wake up early from her nap.
    chocolate pudding recipe
  8. Drop in the chocolate chips and vanilla and stir vigourously until chocolate is melted.
    decadent chocolate pudding
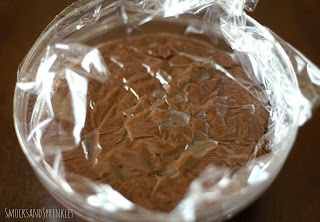
  9. Transfer pudding to a bowl and cover it with saran wrap.  Make sure the saran is actually in contact with the top of the pudding, so you don't get the pudding skin on top as it cools.
    decadent chocolate pudding
  10. Cool to room temperature, and then refrigerate for a few hours.
  11. Serve with fresh berries and a dollop of fresh whipped cream.
    decadent chocolate pudding

Tip!  If you want a lighter, mousse-like texture, consider whipping up some more heavy cream (!!) and folding it into the pudding.

It's probably not the best idea to eat this for breakfast, lunch and dinner, but make it for your next dinner party! And let us know how many groans of pleasure you hear as your guests enjoy it!

decadent chocolate pudding
Pin me for later!

Related Posts Plugin for WordPress, Blogger...