Showing posts with label DIY. Show all posts

Thursday, 16 June 2016

Quick DIY Father's Day Gift Ideas

Oh boy! Father's Day is coming up quick, real quick! Since we are the biggest procrastinators ever, we decided to come up with a short list of easy and inexpensive Father's Day gifts that you can whip up in no time...since we have very little time...yikes!

Maple Bacon Short-Bread Cookies
Yep, the goodness of bacon and short-bread will be sure to delight any man...except for mine, he dislikes both. He's definitely NOT the norm though. Most guys would LOVE to bite into these savory delicious cookies (we stumbled upon the recipe on Closet Cooking). With only 6 ingredients, they are incredibly easy to make! Throw in some dried herbs to make them extra savory or add some dark chocolate chips for a sweeter treat.

Mason Jar Gift Set
You can fill mason jars with pretty much anything: favourite treats/snacks (try to get creative...candied nuts, flavoured popcorn, coffee beans, maple bacon cookies, BBQ sauces), Father's Day coupons, sports paraphernalia etc.
Here is a great list of ideas to fill up your jar. Package it up all cute (check out our post on mason jar gifts) and you are good to go!
image from: http://creativelychristy.blogspot.ca/2012/06/diy-fathers-day-treats.html
Hand-print Art
Get your kiddies involved and whip up some adorable hand-print artwork! Have a look at this Father's Day book we made last year for some cute ideas.

Sharpie Mugs
All you need is a cheap plain white ceramic mug and some sharpie markers! Have your kid decorate the mug, bake it in the oven (350 degrees for 30 minutes) and wrap it up for an awesome gift. Full tutorial here.
image from: http://www.handmadecharlotte.com/diy-sharpie-mugs/
Coffee Cozy
Your kid will have a blast making this easy craft for all the coffee loving dads out there! Follow our tutorial to make your own!


Good luck on your last minute gifting...it's the thought that counts, right?! Happy happy Father's Day to all the amazing men in our lives!


Saturday, 5 March 2016

DIY Bowties for your Little Guy

DIY bowtie

Little boys in bowties are the bomb diggity.  Seriously, can you resist them when they look like this?!

little boy's bowtie

Bowties are actually deceptively simple to make!  You can use hot glue to hold it together if you're not going to use it much, or sew it for longevity.  Pair it with some suspenders, a cute button up shirt, and maybe some horn-rimmed glasses?  Save this tutorial for your hipster teenager's prom, too!  You can wear the bowtie by attaching straps, safety-pinning, buttoning etc.  Pssst...if you attach it to a headband base (check out our headband tutorial for measurements in step 13), you can double it as a cute bow hairband, or put it on a clip as a cute hairbow!

bow tutorial

Materials:
  • fabric of your choice
  • hot glue gun & sticks or sewing needle with matching thread 
  • velcro, clip, button or safety pin

Tip!  Use a lightweight cotton material for a crisp, clean look (like my gray bowtie) and easy assembly.  The striped bowtie is made of stretch jersey and was thick and more slouchy looking.  It was also harder to work with when assembling.

Method:
  1. Cut your fabric into 3 pieces as indicated in the image (these measurements are for a toddler bowtie - see the end for the man-size measurements).
    bowtie tutorial
  2. Take the rectangle #1.  This will form the main bow.  Fold one side into the middle.
    bowtie tutorial
  3. Put a small line of glue at the top and bottom.  Fold the other side in and press into the glue.  You'll notice that the middle is left open.
    bowtie tutorial
  4. Put one dot of glue in the centre and adhere the fabric.
    DIY bowtie
  5. Fold both ends into the centre and put dots of glue to adhere them, overlapping them by about 1/4".  This becomes the main bow part.  Set this aside while you work with the other fabric pieces.
    boy's bowtie
  6. Take the smallest rectangle (#3).  Run a line of glue on the right side (the front, nice side) of the fabric.
    bowtie tutorial
  7. Fold the fabric in half on top of the glue.  Wait a few seconds for the glue to dry.
    bowtie tutorial
  8. Flip this fabric tube inside out.  This will be the middle of your bow.
    bowtie tutorial
  9. Take this piece and wrap it around the middle of your larger bow piece and glue it, scrunching the bow piece.  Hide the raw edges of the bow inside this middle piece.
  10. Optional: I "unrolled" part of the striped bow to make it a little fluffier.  I left the gray one as is.  You can play around with it.
    DIY bowtie

    bowtie tutorial
  11. When you're happy with the creases and bunching in your bow, use hot glue to preserve all the folds.
  12. You can hot glue this bow to a clip, or you can do what I did and attach a safety pin because I'm lazy and didn't want to add any more steps!  I just slipped the pin underneath the center piece and glued it.
    DIY bowtie
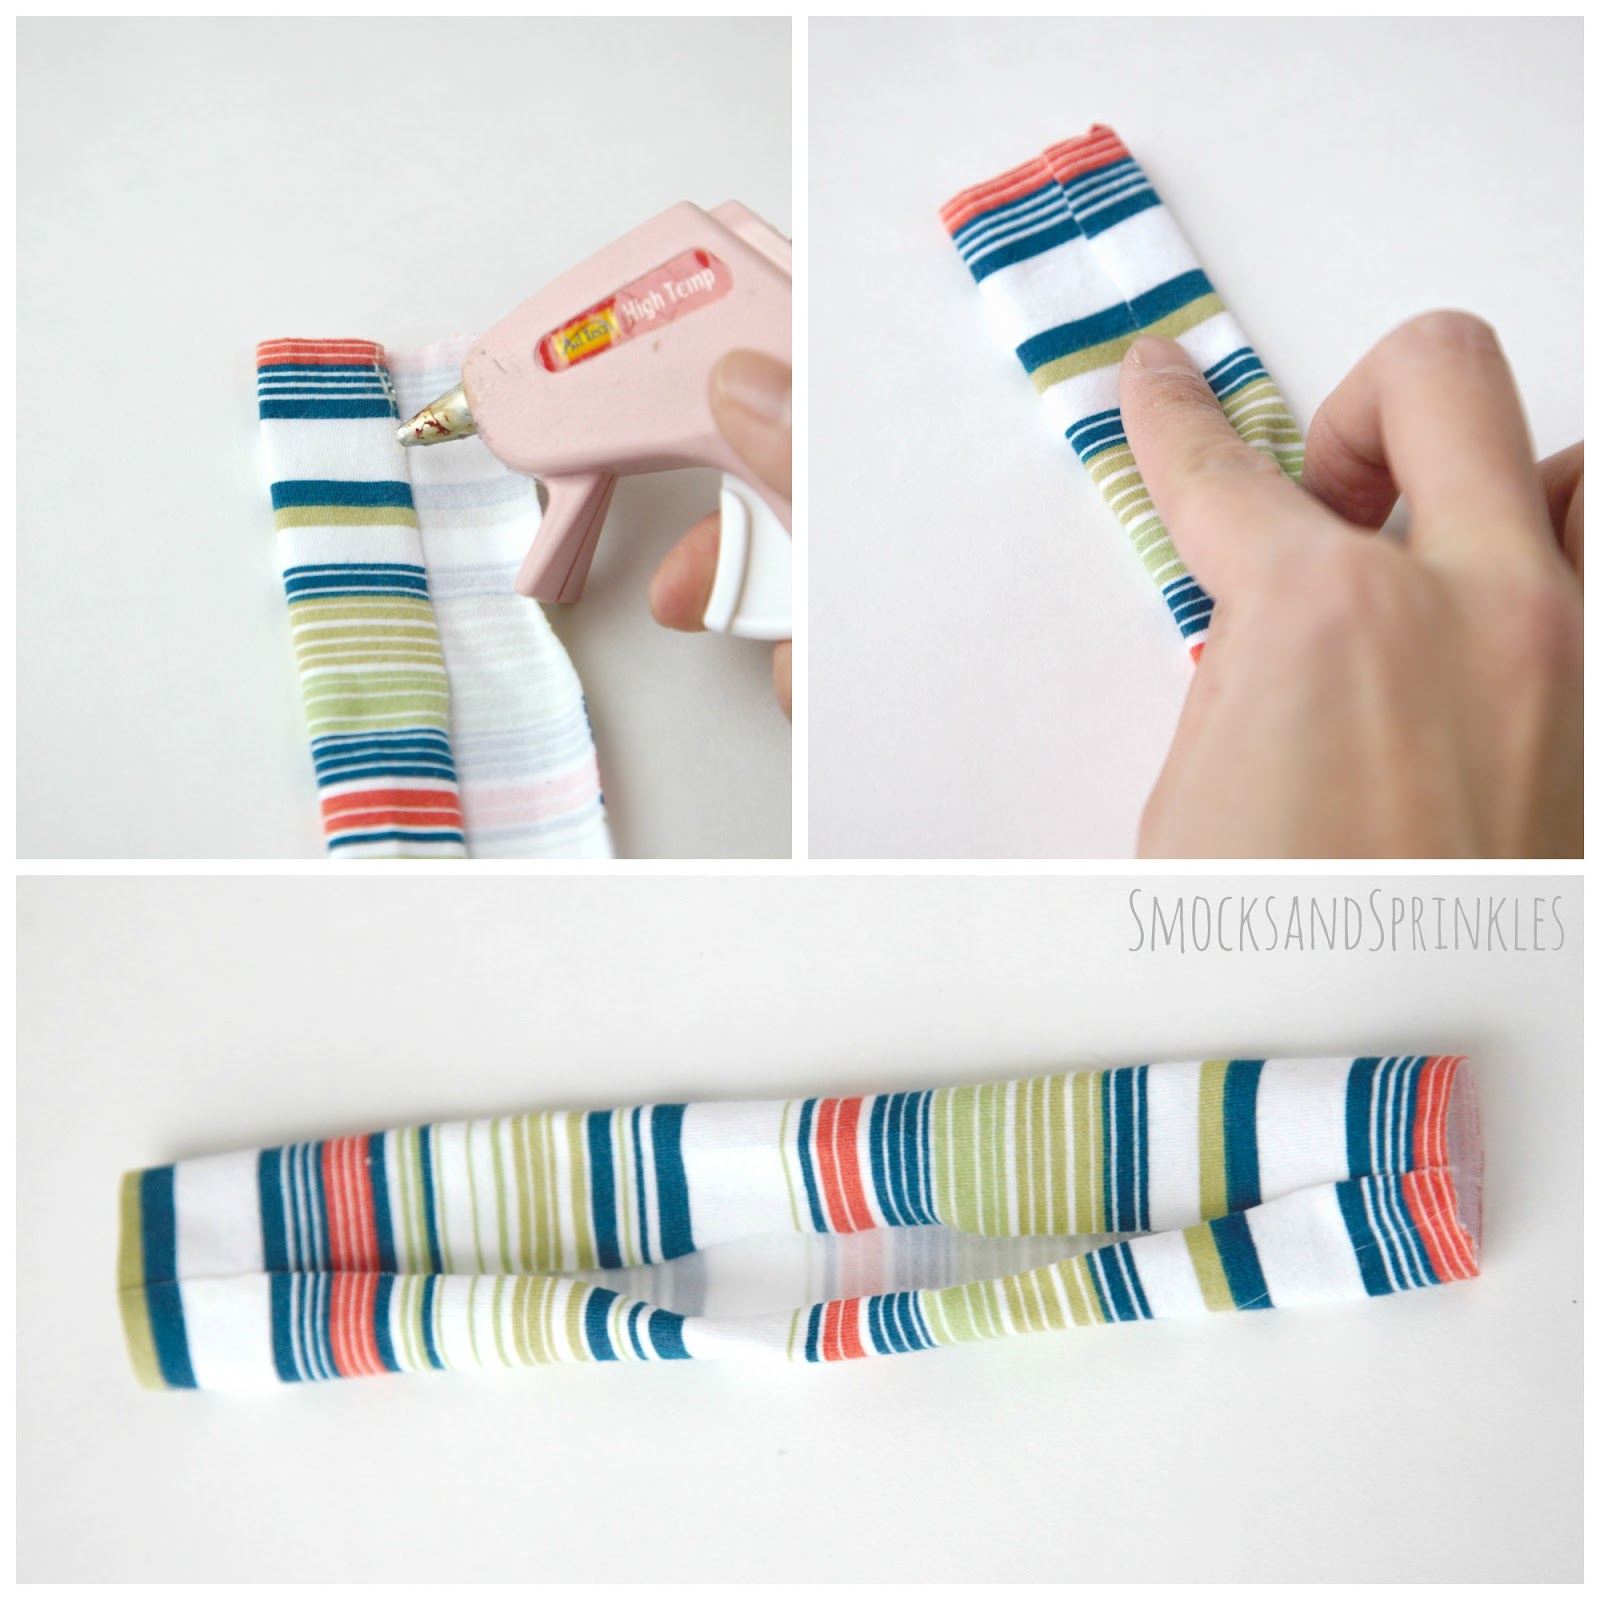
  13. You could also attach it to a strap.  To make the strap, I took the long, skinny fabric piece (#2) and folded in one side.  Applying hot glue in small sections, I folded the other side on top until I had a tube.
    Boy's bowtie
  14. Adhere the bow to the center of the strip using some more hot glue, or string the strip through the middle bow piece.
    boy's bowtie
  15. Attach either a button or velcro (I recommend sewing buttons and velcro) to the ends of the strip so you can close it around your toddler's neck.  If the size isn't quite right, cut the strip to the right size.  If this step is too difficult, you can always tie it at the back, but you'll need to make it slightly longer.
    DIY bowtie
You can also sew a button directly to the bow, so that you can button it straight on a shirt.  Voila, you have the most dapper gentleman you've ever seen!

DIY Bowtie

One of our readers requested measurements for a man-sized bowtie, and I thought it was a great idea so I crafted a large-size one.  She said she wanted to make matching bowties for all the men in her life!  Can you imagine how cute that would be?!  The measurement for the man-size large bow piece is 11" x 4" (21.5cm x 10cm).  The small center piece is 1.6" x 2" (4 cm x 5 cm).  Follow the same directions!  And I say just safety pin it on the big boy.  He can handle himself around pins.  Hopefully?

Be sure to tag us on Instagram (@smocksandsprinkles) so we can see all the cute gentlemen in your life, sporting these easy bowties!

bowtie tutorial
Pin me for later!

Tuesday, 15 September 2015

DIY Personalized Birthday Sign


birthday sign
You have probably seen these cute posters everywhere...Etsy, Pinterest, on your Facebook newsfeed. They make a fun birthday sign and keepsake. I wanted to get one for my son's first birthday but really didn't feel like paying someone to do it. A mommy friend (thanks Stacey!) told me all about Canva, a super user-friendly graphic design software that is available online and free (unless you choose to upgrade to fancier options). I tried it out and I'm totally Canva obsessed. You can easily whip up professional looking party invitations, posters and anything else your little crafty heart desires. Okay, enough gushing about Canva, let's move onto the tutorial!
  1. Before you start, think of a colour scheme and theme. I chose light turquoise/red/white with a black background and a "little man" moustache theme.
  2. Log onto Canva's website.
  3. Select poster.
    diy birthday sign
  4. Select your background colour. Black or dark gray works great for these kinds of posters (the text really pops).
    diy birthday sign
  5. Click on text. Here you can choose a wide variety of different fun text designs to add in. You can easily change the colour, size and font of the text. Scroll down to get some ideas for content to add in!
    diy birthday sign
  6. Click on search and frames if you want to add in a photo. You can select from a wide range of photo frames to display your little one's picture. Once you have selected your frame, click on upload your own to enter your photo into your frame.
    diy birthday sign
  7. Click on search and illustrations/shapes/photos and type in the name of any images you are looking for. You can also download your own by clicking on upload.
    diy birthday sign
    diy birthday sign

  8. This is the trickiest part! You will need to fit in all your font/images/photos like a puzzle.  If you aren't feeling particularly creative, feel free to copy our sign!
  9. Download your image as a pdf for print and save it onto your computer. I used Vistaprint during a 50% off sale to print this sign. I heard Costco is also a great place to have posters printed for great prices. Don't forget to print an extra 8x10 image to put in your child's scrapbook or photo album!
  10. I found it easiest to display the sign by mounting it onto foam board. You can buy foam board cheap at the dollar store. Cover the foam board with colour coordinating wrapping paper and then stick the poster on top for a really fun birthday sign!
diy birthday sign
How cute is this red and white polka-dot wrapping paper!

Here are some ideas for content to include in your sign:
  • Favourite toy/object, food, song, activity etc.
  • Height
  • Weight
  • Number of teeth
  • Date of firsts- sitting up, crawling, walking etc.
  • Best friends
  • Nicknames
  • First words
  • "I know how to____ (feed myself, roll a ball, blow kisses, give high fives etc.)"
  • For older kids- "I know how to ____ (count to 10, sing my ABC's etc.)", "I want to be a ____ when I grow up"
diy birthday sign

Have you ever made a personalized birthday sign? Please feel free to share with us below so we can get some fresh ideas for future birthdays! Hope you enjoy Canva as much as we do!

Wednesday, 26 August 2015

Cute Knotted Headband - Fast, easy, no-sew!

DIY knotted hairband
Ever since I saw these knotted headbands, I've been meaning to make my own.  I mean, how hard can it be?  Cut a strip of fabric and knot it, right?  YES!  It's really that easy.  Even easier than the flower headband.  I'm serious, I made my first experimental one in less than 5 minutes, and I wasn't even sure what I was doing!

knotted headband tutorial

Materials:
  • jersey, knitted fabric, or an old T-shirt
  • scissors
  • headband pattern (you can download it here)

knotted headband tutorial
Method:
  1. Cut a strip of fabric 22" x 4" long.  Make sure the stretch goes horizontally, so the headband will stretch.
  2. Print out the pattern.  Or don't.  This headband is so easy, you can probably wing it!
  3. Fold your fabric strip in half.  Place the template with the pointed edge towards the ends.  Pin and cut the fabric along the solid lines.
    knotted headband tutorial

    knotted headband tutorial
    Look at this horrible cutting.  And the headband still turned out great!  Told you it's easy!
  4. Tie the fabric in a cute knot, incorporating the skinniest part of the fabric into the knot and voila, you are a headband master!

Tip!  You can adjust the size of the headband as your baby grows by adjusting the placement of the knot.

knotted headband tutorial

You'll be surprised at how easy this headband is to make, and how cute it looks on your little one.  You still have time to make one for the first day of school.  And make sure to share photos of your creations!

DIY knotted hairband

Sunday, 5 July 2015

Easiest Stained Glass ever!

I needed to keep my toddler busy today, so it was craft central here!  I keep a stash of precut tissue paper squares for all sorts of art activities, and today it was stained glass.  These look beautiful in the window and are great for any occasion.  The best part is, they keep your toddler busy for a while!

Materials:
  • clear contact paper (I bought clear book protector at Dollarama, in the stationery section)
  • tissue paper in different colours
  • construction paper or bristol board
  • scissors
Tip!  If you can't find clear contact paper or something similar, you can use wax paper or acetate and adhere the tissue paper using a glue stick, or watered-down glue.

Method:
  1. Cut your contact paper into a 2 squares/rectangles (make sure it will fit the frame shape you want to use).  Keep the paper backing on while you do this!
  2. Next, cut your tissue paper into smaller squares.  If you want to get organic with it, you can rip it or cut it into random shapes.  Your junior crafter can definitely help with this!
    It also keeps them busy to play with the tissue paper
  3. Cut out the construction paper frame for your stained glass.  If you want to keep it simple, just cut out 4 strips to paste along the outside.
  4. Make a few loops with your tape and adhere it to the contact paper (on the shiny side, not the paper side) and stick it to your work surface (this will keep it from rolling up when you peel off the paper backing).
  5. Peel the paper backing off the contact paper and adhere your construction paper frame and shapes.
  6. Now the fun begins!  Start to stick the tissue paper on your sticky contact paper.  You can get your children to do this part (I've done this with kids as young as 2 years old.  Younger than that and they tend to eat the tissue!).   Keep sticking until all the stickiness is covered.  Or you can leave some parts exposed...this will depend on the attention span of your child.  Or you?
    She decided to crumple the tissue paper.  Type A me died a little inside.
  7. Optional:  Once you're happy with the tissue paper placement, take the other piece of contact paper and peel off the backing.  Carefully lay it sticky side down on top of the tissue paper, to seal it all in.  If you don't want to do this, you can leave the tissue paper exposed to keep it simple.

  8. Use your scissors to trim off any excess contact paper around the outside of your frame.
Tip! If you're feeling fancy, you can also cut some shapes out of the black paper as silhouettes for the centre of your stained glass. Stick these on before you start the tissue paper in step #6.


Voila!  You're done!  Isn't it amazing? Aren't YOU amazing?  The shapes make it really customizable!  Making them for Valentines' Day?  Cut out a bunch of hearts.  Thanksgiving?  Cut out some leaves or pumpkins!  If you're feeling really fancy, you can cut thinner strips of black paper to act as the "lead" piping and make a design on your contact paper before adhering the tissue paper.  The sky is the limit!
Crafting is always more fun with a fuzzy friend

If you make this with your kids, be sure to let us know how it went!  We'd love to see your masterpieces.

Happy stained glass-ing!
Pin me for later!
Related Posts Plugin for WordPress, Blogger...