Saturday, 31 October 2015

Build-a-Bear Birthday Party Review

So you know how you're always looking for interesting birthday party ideas, going on Facebook mommy threads to find out what everyone did for their birthdays and scouring Pinterest for themes?  Indoor play area birthdays are all the rage, but we recently attended a Build-A-Bear party and wanted to share about it, in case you wanted a different idea!


We got the invitation to our Build-A-Bear party via Evite, but you can also print paper ones.  Build-A-Bear provides different images for your invitations in case you want to use them.  When we arrived at the party, each child got a name tag, and I think they were also supposed to get a crown, but they didn't hand them out this time.  The brochure said that the bears are supposed to get a party hat, too?  We didn't miss them, though, because I'm sure Kiyomi would have taken hers off 2 minutes after receiving it, anyway.

Waiting to choose their animals

Our party leader introduced herself and had all the guests line up to choose their animal, out of a choice of 3 (brown bear, white bear, dog).  We asked about paying extra to upgrade to a different animal but were told we couldn't, since we were part of a party package.  I think this was a good thing, because you better believe we had our eye on the Darth Vader Bear, and I didn't realize until later that he costs almost $40!!  After that, I was gunning for the dog, but Kiyomi chose the white bear.  Womp womp womp.  But okay, this is her bear.  Not mine?


We did a fun march over to the stuffing area, where we played "I Spy" for a bit while the leader stuffed the bears one by one.  I think the best part for the kids was stepping on the pedal to get the machine to blow the stuffing into the bear.  I was impressed at how patient all the kids were while they waited for their turns, except for my girl who scooted her way to the front, haha.


After that, we lined up again for hearts.  This is obviously the most important part, because it brings your bear to life.  Fortunately, they weren't too busy in the store, so another staff member helped sew up the bears.  They were fast, so each bear took only a few minutes to stuff with a heart.  Kiyomi still talks about how she gave her bear a heart.  Awwww.


Then it was shower time!  Again, a little bit of waiting, but 2-3 kids could "wash" their bears at a time, so it was faster than before.  They took a little brush and combed the bear fur.  Very cute.  Then it was time to choose outfits.  I was impressed that they had around 5-10 different t-shirt choices, including Captain America, R2-D2, and some pretty fancy dress-up outfits!  A little more waiting while everyone chose, but more entertaining this time because we got to check out the outfits.  I think to ease the pain of not getting Darth Vader Bear, Kiyomi chose the R2-D2 t-shirt.  Her father was so proud.  Each bear also got 2 hair ribbons or a bowtie.


We marched over to another area for the Build-A-Bear ceremony, which involves the Build-A-Bear pledge about being #1 pals with your bear forever (i.e. until your bear gets too dirty, falls apart, or every parent's nightmare - gets lost!), and each bear got a birth certificate and bear condo (the official name for those cardboard boxes they put the bears in). I was super-impressed that they kept track of all the bears' and kids' names so they could put them on the birth certificates!

Look at the detail on this shirt!  So glad she chose it!

Our party leader was really great about remembering names, because she called the kids by name, even after they lost their nametags (of course).  I wish she had played more games with the kids to keep them entertained though, because we only did 2 rounds of "I Spy".  Most of the kids were old enough to wait patiently through all the steps, but I imagine this type of party would be rough for more active children.

Lots of waiting, but the kids were all really patient!

After our party, we moved to the mall food court where we had bagged lunches (in cute paper lunch bags decorated with stamps and colored by the birthday girl) and cupcakes.  Kiyomi loved the experience and was a goofball in the food court.

Still content, 1.5 hours later!

Build-A-Bear has different packages at various price points, depending on the number of accessories you want to include for each bear, but I think it's pretty reasonable, especially because the location, activity, and "loot bag" are all included.  I also think eating in the food course is an amazing idea, because it takes the pressure off of needing to have an elaborate food spread!  :)  The best part is that it's really easy in terms of prep and work involved.  The party ran around 1.5 hrs, and my one-year-old managed to hang out in the store the entire time.  Many Build-A-Bear stores are located in malls, so you can always take the little ones for a walk, or do a little shopping while the kids party.  Most of the parents stuck around, but they didn't really need to.


Overall, we enjoyed the party and the kids seemed to love their bears.  I wouldn't recommend it for really small children or kids with a short attention span, as there's a lot of waiting and lining up involved.  Otherwise, I think kids of all ages (read: husbands who are into Star Wars) would have a great time!  Kiyomi really likes her bear, but he didn't make the cut for bedtime lovey.  Maybe in time?

Have you ever been to a Build-A-Bear party?  Or have other ideas about great birthday party venues?  We probably have at least another 10 years of birthday party planning to do, so we'd love to hear your experiences!

Sunday, 25 October 2015

Operation Christmas Child! November 16-22!

operation christmas child
We know, we know, it is waaay too early to be discussing Christmas when Halloween is still around the corner. Unless the topic is about Operation Christmas Child...the much loved annual charity project that has a mid-end November deadline! For those of you who aren't aware of Operation Christmas Child, it provides underprivileged children around the world with the opportunity to experience the excitement that our children are blessed enough to experience on Christmas morning (for those of us who celebrate). The concept is simple, you pack a shoebox sized container with toys, hygiene products, school supplies etc., add a special note and drop it off at a local collection center.
operation christmas child
So proud of the boxes! Note that we opted to use plastic reusable containers.
The shoebox will be delivered to children around the world impacted by war, poverty, natural disasters etc. I can only imagine the look on their faces when they are handed one of these special boxes filled with so many goodies! We have made it an annual tradition in our household to participate in Operation Christmas Child. This year, my preschooler was fully in charge of selecting and packing the boxes. I definitely had to provide some guidance, otherwise all of the boxes would be loaded with Disney Frozen products or pet toys (don't ask, she has a thing for pet toys). This is a great activity to do with your children to teach them empathy and compassion. My daughter was super excited about shopping for other children.
operation christmas child
She really got into it and didn't ask me to buy her one single item (such a proud mom moment). It was so sweet to see the thought that went into her purchases.
operation christmas child
All shopped out!
If you want to get involved, please have a look at the website and follow the detailed instructions! And remember, no candy/food products. There is a great list of the best things to pack in the shoeboxes here. National collection week is November 16-22 so get packing:)
operation christmas child
Examining the loot!
operation christmas child
Tip! Kid's birthday party coming up? Consider having guests bring a packed shoebox or shoebox items in lieu of birthday presents! 
operation christmas child
Drawing a picture to add to the shoebox<3
What acts of charity do you encourage your child to get involved in? Please share with us below so we can continue to raise compassionate children together.


Saturday, 17 October 2015

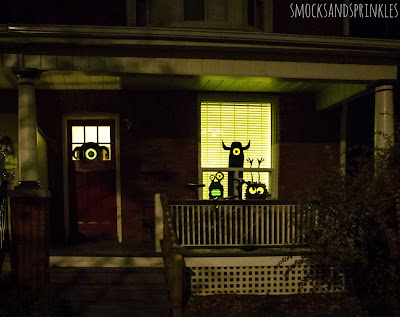
Spooktacular Monster Silhouettes!

spooky monster decorations
Halloween is just around the corner and it's time to get those spooky decorations up! If you are looking for a unique, inexpensive and super-cute way to decorate your place, look no further! Monster silhouettes are easy to make and my toddler nearly lost her mind with excitement when I first put them up. In fact, she loved these adorable monsters so much we ended up keeping one up in the house all year round. I originally found my inspiration while surfing the net one day. Here is the pic I came across and I knew instantly that I had to have these googly monsters in my house...ASAP.
image from: http://fashionnaction.blogspot.ca/2011/10/googly-monster-house-halloween.html
Materials (ALL from dollarama!)
  • Black bristol board 
  • Yellow or green tissue paper (or any spooky colour you want!)
  • Scissors 
  • Tape 

Instructions
  1. Cut out monster shapes from black Bristol board (if you want to make giant sized monsters, just tape pieces of Bristol board together). See shutterstock pic below for some inspiration (or just google images for "monster silhouettes").

  2. Use coloured tissue paper to cover eyes, mouths etc. 
  3. Tape monsters onto windows. 
  4. When it gets dark out, turn on the lights in your house to bring these monsters to life! 
spooky monster decorations
Check out the cutie-pie monster with the googly eyes and waving arms!
 So simple and fun! Your house will be the hit on the block so be sure to get lots of candy to hand out:) What spooky decorations are you planning on putting up this year?
spooky monster decorations
Note the annoying bike left on the porch which ruined this picture...ugh.
 Happy Halloween!

Tuesday, 13 October 2015

Chemical-free, Fast Car-cleaning | e-cloth Review & Giveaway

<Stay tuned, because we're hosting a giveaway at the end of this post!>

Dust, grime, hair and dirt are the bane of my existence.  I could save so much time in a day if I didn't have to clean (read: more beauty sleep), not to mention the money I could save on cleaning supplies!  And aren't we all looking for more natural ways to clean, so we don't expose our little ones to harsh chemicals and solvents?

Microfiber cloths have changed my life.  I admit it, I bought my first one after I saw a live product-demo (sometimes I am such a sucker for infomercials!!), but it's really as great as they say it is!  The e-cloth can be used to clean tons of surfaces, with just a little water.  Yes.  Streak-free shininess and removal of 99% of bacteria using just water! I use mine to clean my glass-top stove, all the mirrors and glass surfaces in my home, and I use it to dust.  I'd use it for more, but I'm trying to prolong the cloth usage, haha.  I just realized I sound like an infomercial myself, but I really just love it that much!


When e-cloth reached out to us to review their auto care products, we were thrilled!  Let's be honest, car-cleaning can be annoying.  It irks me to spend money on car washes, but it saves time, so I head to the gas station for my washes.  I thought that if the e-auto car cleaning products were as good as the original e-cloth, I could really save time and money, and that I'd be way more likely to wash my car at home.

I picked a warmish fall day to test out the e-auto car cleaning kit, which has their Dual Action Mitt, Dry & Shine Cloth and Glass & Chrome Cloth.  The overall results?  Sparkling car in less time, using way less water than a usual car wash in my driveway!  I loved the Dual Action Mitt and Glass Cloth, and they did such a great job that I didn't end up needing the Dry & Shine Cloth.

Please ignore the chips in the paint!


The instructions said to soak the car with water (no detergent necessary!) and then use the Mitt to remove dirt and grime.  I just slipped it on my hand and rubbed away, starting at the top and doing the bottom parts of the car last.  I could see right away that it was removing a lot of the dirt, and you can see how dirty the Mitt was getting. As with any cloth or sponge, I was careful to rinse it frequently so that I didn't build up dirt particles that would scratch my car.   It seemed to really picked up the dirt, instead of smooshing the dirt around on the surface of the car.  The only complaint I had was that it doesn't come with a telescopic handle of some sort for the roof of your car.  I found it hard to reach the center of the roof, and I can't imagine the acrobatics you might need to get to the top of your minivan or SUV.  Still, I like it way better than my old car cleaning brush.  I think I'll call the Mitt, "My Cleaning Muppet."
See the parts where I didn't use the Mitt?  Still dirty.  I wish that I could just hose down the car, but obviously, a thorough clean requires a little more elbow grease.  And an orange muppet.


Ew, look at all the dirt that comes off the Mitt!

The water I used to soak the car started to dry by the time I got to some parts, but the moisture from rinsing the Mitt was enough to scrub the dirt off.  I also had to wet the Glass cloth a bit before I started the windows, as the windows had dried a lot, too.  The Glass cloth was amazing at leaving a streak-free shine (no squeegees needed!), and it was super-fast and easy to use.  I really can't believe I didn't have to use a glass cleaning solution!   I didn't use it on the interior this time, but I'm sure it would be great for cleaning the insides of the windows, and really any glass surfaces you might have inside your house!  Am I really getting this excited about cleaning?!


At the end, there were a few spots that were still wet, so I tried out the Dry & Shine Cloth.  I'd say that this cloth is the most comparable to a chamois (I love those things for washing cars!), but I think because it was my first use, it ended up leaving dust and I gave up using it pretty much immediately.  The car was almost dry (and streak-free!) by the time I finished the windows, anyway, so I didn't really need it.


The Dry & Shine Cloth did get dirty when I used it, which means I still had some dirt on my car, but you really couldn't see it at all unless you were super close-up!  For a more thorough clean, you'd probably have to spend a little more time scrubbing the car and rinsing the Mitt.  It took around half an hour from start (soaking with water) to finish (totally dry), and that was with my 11-month old strapped to my back.  He may have managed to pluck some leaves from a nearby bush while he was hanging out back there.  He may also have eaten some leaves before I noticed.  I was just super-engrossed in cleaning the car!  I think I would have been a lot faster without him on me. 


I showed off my handiwork to my family, and they were impressed with the shine, the minimal amount of water I used, and the fact that I used no detergent or any chemicals for the clean-up.  My driveway is usually soaked after a car wash, but you can see that my water trail didn't even make it to the street!  It's also great because a lot of cities and towns have by-laws against rinsing soaps into the street sewer system.  Good for my wallet, and the environment!


To summarize:
Pros:
  • easy-to-use
  • no detergent/soap necessary
  • saves water
  • fast (reduces the steps you need to clean your car)
  • no need to dry for streak-free shine
  • easy clean-up (just throw it in the laundry)
Cons:
  • difficult to use for hard-to-reach areas
  • still some dirt residue left, although it wasn't visible
  • didn't really need the Dry & Shine Cloth (is this a pro?  Maybe it's a pro.)
Missed a spot!
So, do you want your own car cleaning kit?!  Enter our Rafflecopter giveaway below for a chance to win one (open to Canadian & U.S. residents only)!

a Rafflecopter giveaway for an e-cloth Car Cleaning Kit!

I'll definitely be using the Mitt and Glass Cloth for my future car washes.  Or having my husband use them?  ;)  If you've ever tried any of these products, let us know what you thought of them below!

Check out the e-cloth website for more information about these and other products, and join their mailing list (at the bottom of their homepage) to stay updated with the latest products and deals!

Note:  These products were sent to us for review, but this post is not sponsored.  All opinions are our own. 

Saturday, 10 October 2015

The Thanksgiving Tree

thanksgiving tree
Teaching your children gratitude is an important part in developing caring, compassionate human beings. In our home, we have a nightly ritual where we spend some time reflecting before bedtime and I have my preschooler name a few things she is thankful for. In the spirit of Thanksgiving and the beautiful fall season, we made a fun craft that is easy and helps your child reflect on the many things they are thankful for.

Materials
  • large canvas (scored mine at dollarama!) or bristol board
  • nontoxic paint (various colours- brown, red, orange, yellow, green)
  • sponge brush or paint brush
  • black sharpie

Method
  1. Paint a tree trunk and branches onto the canvas
    thanksgiving tree
  2. Using different paint colours, have your child fill the tree branches with "leaves" using their handprints
    thanksgiving tree
  3. Allow to dry
  4. Using a black sharpie write one thing your child is thankful for on each leaf (you would be surprised with what they come up with)
  5. Proudly display their artwork!
    thanksgiving tree
My preschooler was so proud of her artwork and really thought carefully about all the things she is thankful for in her life. Such a great way to start off this gorgeous Thanksgiving weekend.

What kinds of activities do you do with your kids to instill gratitude? Feel free to share with us below! And a very happy Thanksgiving to all of our loyal smocks and sprinkles readers. We are so thankful for all of you <3


Related Posts Plugin for WordPress, Blogger...