Friday 29 May 2015

Chocolate Pudding Series | Chia Chocolate Pudding

What's a girl (or guy!) to do when she has a chocolate craving?  We're kicking off our healthy chocolate pudding series with a recipe for chia pudding!  Chia seeds are packed with fibre, omega-3s, protein, and are a great alternative to gelatin in pudding, especially if you're going vegan.

chia seeds
You can find chia seeds at Bulk Barn, Whole Foods, and other grocery stores.  I found ground chia at my local Loblaws!  Would you believe I used to have my husband grind up chia seeds with a mortar and pestle (I know, am I a pioneer?!)?  He was reaaaaally happy I found already ground ones, haha!


Chia seeds are really neat because they form a kind of gel when you put them in liquid.  You can put them in smoothies, juices, and other drinks to thicken them and add nutritional value.  I haven't tried it, but you can apparently use gelled chia seeds as an alternative to egg in some recipes.  Admittedly, you might find the texture of chia a little bit slimy when you first try it.

Toddler-approved!  Chocolate pudding you don't feel guilty about giving to your kids!

Tip!  If you're afraid of committing to a whole pack of chia seeds, buy just a bit at the bulk food store and put it in some juice to try it out!  Look, you've just made your own Mamma Chia drink for a fraction of the cost!


This dessert is basically choose your own adventure, because it's so customizable!  You can decide what type of milk you want, what type of sweetener to use, and how much you want of each.  You can even switch out the cocoa for vanilla, or steep tea in your milk for a milk tea flavour.  Or maybe even matcha?  Yum!

Ingredients:
  • 1/3 cup chia seeds (ground or whole) - I like ground chia because it makes for a slightly smoother pudding. Whole chia seeds make the pudding slightly crunchy.
  • 1.5 cups milk (coconut, almond, soy...your choice!)
  • 2 tbsp cocoa
  • 2 tbsp honey, maple syrup, or other sweetener (you can adjust the amount according to the demanding needs of your sweet tooth)
Method (this is so easy...you basically just mix everything together in a bowl!):

  1. Mix honey and cocoa with milk.  I took about a 1/2 cup of milk, warmed it, and mixed my honey and cocoa into it.  This dissolves the honey faster, and it's easier to get the cocoa lumps out!

    Mmm...tasty Argentinian honey!


  2. Stir in chia seeds and whisk until well combined.
  3. Refrigerate for a few hours to allow chia seeds to absorb the liquid.
  4. Garnish, serve and enjoy!
Tip! If you want a thicker pudding, add more chia seeds.  Want to make it more of a thick chocolate shake?  Add fewer chia seeds.

Pin me for later!
Have you tried chia seeds before?  Try making this decadent dessert this weekend.  Your kids will never know how healthy it is!  And let us know how it turned out!

Wednesday 27 May 2015

We all Scream for Ice Cream Parties!


For my daughter's third birthday, we opted for a small party at home with a few of her closest friends. My daughter is obsessed with ice cream. She would eat it for breakfast, lunch and dinner if given the choice (frankly so would I), so it only made sense to throw her an ice cream themed birthday party. You can use an ice cream theme for any type of party really (bridal shower, baby shower etc.).


We chose light shades of pink and turquoise as the main party colours. Fresh, springy and so pretty paired together. We purchased a $6 printable clip art set off Etsy and used Vistaprint services (during an awesome sale) to create fun party decor (posters and stickers). The rest of the decor was found at dollar stores (I can spend a lifetime in those stores) and online sales - check out Party Stock and Open A Party for amazing party stuff. The ice cream party hats were hand made using inexpensive materials from the dollar store. They look tricky to make but they are actually really easy!


An ice cream sundae bar. I repeat. An ice cream sundae bar. We couldn't possibly host an ice cream themed party without an ice cream sundae bar!


We created a healthier version by offering vanilla frozen yogurt and toppings such as fresh fruit and shredded coconut. Okay, we also included chocolate chips and chocolate sauce...we wouldn't want to disappoint! We chose to omit nuts because of guests with allergies. You can store the ice cream in a big bucket full of ice to keep it nice and cold. Guests could choose to enjoy their sundaes in waffle bowls or paper ice cream cups (scored these pink striped ones at the dollar store!).


The 3-bowl plastic containers holding the toppings are from the dollar store. We stuck on some chalkboard stickers (also from the dollar store...I literally cheered for joy when I stumbled upon them) and wrote on them with a chalkboard marker. Yes, your eyes are not deceiving you. Chalkboard markers exist and they are pure genius! You can find them for a reasonable price at amazon.ca. And we couldn't resist wooden dessert spoons...they are so cute. You can dress them up with ribbon, jewels, stamps or washi tape.


Tip! Use mason jars (cheap, reusable and adorable)
  • To display toppings for a sundae/yogurt/waffle etc. bar 
  • Hold cutlery/straws/napkins 
  • For flower arrangements 
  • To serve food (perfect for putting out ice cream, yogurt parfaits, smoothies, puddings etc) 
You can make them even cuter by tying ribbon around the neck of the jar.

Ice cream cone cupcakes, cupcakes with paper toppers and mini Rice Krispie ice cream cones completed the dessert selection.


Ice Cream Cupcakes: I highly recommend serving cupcakes in ice cream cones; so easy for kids to eat (no cake cutting and plates/utensils required). You simply bake the cupcake batter right inside the flat bottomed ice cream cones (fill about 3/4 of the cone with batter). Flat bottomed ice cream cones are obviously key so you can place them right inside in the oven on a baking pan or even a muffin tin.

Paper Cupcake Toppers: Paper toppers are super easy to make. All you need is a scallop punch, card stock, circle shaped stickers and toothpicks. Punch out two scalloped circles from the cardstock, sandwich a toothpick in between (adhere with tape) and glue scalloped circles together (make sure to line them up neatly). Slap on the circular sticker to the front and even to the back if you want a double sided topper.

Rice Krispie Ice Cream Cones: The mini Rice Krispie ice cream cones were too cute for words and simple to make. Just whip up your regular Rice Krispie mixture and then mold into little balls while it's still warm. Use candy melts to attach balls to the cones. Then decorate! You can dip or drizzle candy melt, add sprinkles etc. Candy melts comes in many different colours so you can easily match to the colour scheme of your party.  You can find them at Bulk Barn and Michaels.


Take home goody bags! Girls stockings in a creamy white "vanilla" colour were rolled to create "ice cream swirls" and placed inside reusable plastic dessert bowls. Strawberry hair barrettes were clipped on top for a sweet effect. Boys received ice cream scoops - socks rolled up into balls in their dessert bowls. An ice cream themed kid craft was added to each loot bag. For baby guests, ice cream themed rubber duckies were placed in cupcake liners and wrapped in a set of three. A little sticker with a picture of an ice cream sundae saying "thank you" was added with baker's twine. And just so you know, I really love baker's twine.  Check out our video for a tutorial on how to make your own!


Tip! Get started on party shopping super early so you can catch awesome deals. You can find all your loot bag items on sale if you shop ahead of time.

The food selection (sushi, mini pizzas, spanakopita, veggie platter, fruit platter, dips etc.) was purposefully chosen so that everyone could find something they liked. It's a nice idea to have some baby food pouches or jars out for your littlest guests to enjoy (no one wants to be in a room full of Hangry babies). Labeled cups (those chalkboard labels are really handy) and paper straws are a fun way to serve up some drinks.

To celebrate the birthday girl turning 3, we showcased pictures of her growing up over the years. Pictures of her taken every 3 months from the day she was born were taped onto a glass door for everyone to view:) Yep, we even decorated the pics to look like ice cream sundaes.
Happy Birthday cutie pie!

Planning a kids party? Let us help! We are full of crafty ideas.  Did you just throw an amazing party?  Share your ideas and photos with us.  We love to see your creativity at work!

Saturday 23 May 2015

Sneaking in sleep...while playing with your kids

We're so excited that we had the opportunity to be guest bloggers on the Parent Life Network!  If you haven't seen our post already, check out the 10 games we play to sneak in sleep while "watching" the kids.

And thanks to all of you regulars who support us in our blogging!  We're so grateful for all of you.

Love,

Nancy & Michelle

Wednesday 20 May 2015

Bananas for Yonanas!

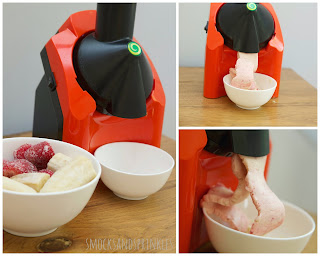
Your daily serving of fruit in ice cream form? Didn't think this was possible until I discovered the Yonanas "ice cream" maker. It has changed my life. Dessert after dinner is no longer a boring bowl of cut up fruit. Ice cream after dinner every night! Or even for breakfast! Or for a healthy snack! Okay, the ONLY ingredient needed to churn out delicious ice cream is frozen fruit. That's it. Just fruit. How incredible is that? Vegan and no added sugars...HURRAY! Move over frozen yogurt, there's a new kid in town.
I found the Yonanas machine for the best price at Walmart. There is an elite model, but the basic model works perfectly.
The trick is to freeze the bananas when they are spotted (nice and sweet but not too ripe).  Peel, wrap whole in cling wrap and freeze for 24 hours.
Thaw frozen fruit for 10 minutes before using.
You can buy bags of frozen fruit at the grocery store.

My favourite flavour is banana strawberry.  You just alternate pushing in chunks of frozen banana and strawberry into the machine.

And voila, ice cream is served in minutes.

Top 10 reasons why you need to own a Yonanas machine (in case you aren't convinced already):
  1. The consistency is a lot like soft serve ice cream. I find it creamier and smoother than using a food processor/vitamix.
  2. Never waste fruit again!  Bananas going ripe? Forget banana bread when you can make Yonanas!
  3. Save money. A lot cheaper to make your own frozen treat at home.
  4. The ENTIRE family will love it (husbands included). 
  5. You feel good eating it and even better when your kids eat it.
  6. Easy clean up!
  7. Light and easy to store.
  8. Endless combinations of flavours and lots of recipes available online (yes, even chocolate recipes).
  9. Great as a healthy topping for waffles/crepes (Au Revoir whipped cream!).
  10. The machine is called Yonanas. Seriously, is that not the cutest name? That's it, I am naming my next pet Yonanas!
Warning you may become addicted to your Yonanas machine and no longer accept fruit in it's natural form. It's okay, we can always form a support group;)

Tip! Want to kick things up a notch? Throw on some toppings: shredded coconut, fresh fruit, granola, nuts...go wild. My daughter loves putting the toppings on herself.

That's organic chocolate sauce, I promise!
Note: Yonanas did not sponsor me to write this raving review. I am simply BANANAS for Yonanas!

What's your favourite Yonanas recipe? 

Monday 18 May 2015

Easy, Homemade Bath Bombs


bath fizzies
They make a cute present or favour!

Remember back in high school science, when your eyes glazed over as your teacher droned on about some chemical reaction involving acids and bases? Are they glazing over now?  Well, stay with me a bit, because we're going to make homemade bath bombs together...using acids and bases!  Waaay more exciting than high school chemistry...more along the lines of the exploding volcano trick you saw at your local science fair!  And, you can make them at home for a fraction of the cost of those expensive Lush ones!

bath fizzies

Materials (to make 8 ice cube size bath bombs)


bath fizzies ingredients

  • 1/2 cup baking soda
  • 1/4 cup, or approximately 100 g citric acid (you can find this in the canning section of some grocery stores, or at Bulk Barn) 
  • 1 tsp oil (I used Olive oil, but you can use any oil that you're okay putting on your body) 
    • Update: I regret adding oil.  I'm pretty sure my daughter is coming out of the bath slightly pinker because the oil is making the food colouring "stick" to her, and to my bathtub!  These bath fizzies can be made just as easily without the oil.  Just add the food colouring to a few drops of water and sprinkle it in instead.
  • Water
  • Food colouring 
  • Essential oil (optional)
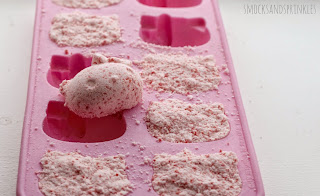
  • Mold (I used a silicone ice tray, but you can use Christmas ornaments to make giant balls, or anything you have on hand) 

bath fizzies

Method

  1. Mix baking soda and citric acid together well using a whisk.
  2. bath fizzies

  3. In a separate bowl, whisk the oil together with the food colouring of your choice. 
    bath fizzies
    It looks a little Dexter slash CSI crime scene-y now, but don't worry, it'll lighten!
    I used 10 drops of red food colouring in mine, but you can use natural dyes/teas, or omit the colour altogether.
  4. Add in a few drops of your essential oil if you want a nice-smelling bath.  I didn't put any in mine because I wanted to save my precious lavender oil for my daughter's feet (can we talk about how she has been waking up in a WAY better mood lately...ever since I started putting lavender oil on her feet before bed!).
  5. Add the oil to the dry ingredients while whisking.
    bath fizzies
    You might see your dry ingredients start to bubble, but don't worry, just keep whisking.  As you whisk, the dye will spread out more evenly in your mixture.
  6. Sprinkle water into the mixture while whisking. 
    bath fizzies
    You want the consistency of clumpy, wet sand. 
    bath fizzies
    I ended up adding about 1 tbsp of water.  Some recipes instruct you to put the water in a spray bottle so you can mist your mixture while whisking, but let's be honest, that's too much work.
  7. Spoon the mixture into your molds. 
    bath fizzies
    Press it into the mold very firmly with your fingers.  Don't be shy.  Really get in there.
    bath fizzies
  8. At this point, do not leave your mixture to tend to your whining child.  The mixture will start to clump in the bowl, and it'll be harder to put into your molds.  I speak from experience.
  9. Leave mold to dry for an hour or so, or longer if you're using larger molds.  Don't stack them right away like I did.  You'll end up with fused bath bombs!
  10. Pop them out and drop them into your next bath!

bath fizzies

My daughter loves putting these into her bath.  The bath bombs fizzed for about 45 seconds!  I recommend making many of these, because there will probably be requests for more.

bath fizzies

Let us know how your bath bombs turned out!

Friday 15 May 2015

3 Bean 2 Bite Brownies

A side dish in brownie form? Yes, please! Red, white and black beans, and sweet potato disguised as a delicious brownie! These brownies are moist, decadent and healthy. No refined sugar and gluten-free! Coconut flour is high in fiber and contains healthy fats and cocoa is rich in antioxidants. It may seem like there are a lot of eggs in this recipe, but you need it to make the coconut flour work and to bind all the ingredients nicely together. Baking is really a lot like chemistry...but tastier! These brownies are really chocolately...more like a rich dark chocolate. My three-year-old daughter loves them but she definitely has a more mature palate than most kids. Hey, if your kids don't end up liking them, more for YOU:)


Ingredients:

  • 1/2 cup white beans (I used unsalted canned beans- drain and rinse)
  • 1/2 cup black beans
  • 1/2 cup red beans
  • 1/2 cup mashed roasted sweet potato (see post on super healthy snack bars for preparation)
  • 1/3 cup pure coconut oil (melted), plus extra for greasing
  • 2/3 cup real maple syrup
  • 4 eggs
  • 1 tsp real vanilla extract
  • 1/4 cup coconut flour
  • 3/4 cup unsweetened cocoa powder 
  • 1 tsp baking powder
  • 1/2 tsp salt

Method:
  1. Preheat oven to 350 F.  Generously grease a non-stick mini muffin tin with coconut oil.  This recipe yields about 32 mini brownies. If you prefer, you can use an 8 x 8 square baking pan instead.  I would line the baking pan with parchment paper.
  2. Combine beans, sweet potato, coconut oil, maple syrup, eggs and vanilla extract in a large bowl. Blend until smooth. You can also use a food processor if you have one.
  3. Sift and combine dry ingredients in a separate bowl.
  4. Add dry ingredients to wet ingredients. Mix by hand until just combined.
  5. Divide batter into muffin tins. I used a mini ice-scream scoop.
  6. Bake for approximately 20 minutes. If using a square baking pan, I would bake for approximately 40 minutes, or until an inserted toothpick comes out clean.
    Fresh out of the oven...mmmmm!
  7. Cool brownies, remove (I ran a knife around each brownie to loosen it) and enjoy! Store in an air tight container and refrigerate. I love them best a little chilled!
Tip!  Feel like really indulging? Throw in a handful (or two) of mini semi-sweet chocolate chips and maybe even some chopped nuts for a real decadent treat. Toasted nuts are really flavourful and a small amount goes a long way. You deserve it.  

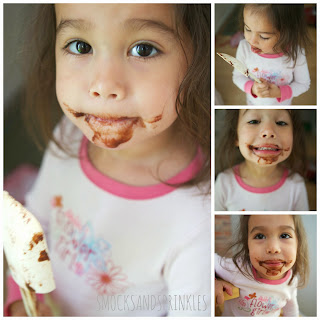
Someone is loving the chocolate batter!
Please let us know how your three bean brownies turn out. Who knew beans and chocolate went so well together!
Related Posts Plugin for WordPress, Blogger...