Tuesday 29 March 2016

Fun & Educational Plastic Easter Egg Activities!

Well Easter has come and gone and we are left with a gazillion plastic eggs...I have stepped on far too many these past few days. As annoying as these plastic eggs may be, they're also pretty fantastic when it comes to creative educational activities for kids. Seriously, there are a ton of different activities you can do with them! Since it was a pretty yucky rainy day today and we were stuck indoors, my daughter and I came up with a fun simple game that she couldn't get enough of! She loved the element of surprise involved in opening up the eggs to reveal the questions.

Fun Plastic Egg Game

Materials
  • Lots of plastic eggs (6 colors)
  • Basket or container for eggs
  • Paper cut up into small squares or rectangles (doesn't really matter)
  • Marker
  • For dice- cube shape (raid your toy cupboard for a wooden/plastic block....we all have one), colored paper (6 different colors that match the plastic eggs to cover each side of the cube), tape

Method
  1. To make the dice, simply cut colored paper to size and tape onto each side of the cube. Make sure each side is a different color (to match the plastic eggs).
  2. Come up with a different question to put it in each plastic egg. We decided to fill the eggs with simple math questions and easy reading words. Write each question out on a small piece of paper and stuff them in the eggs. You can really fill the eggs up with anything that you are trying to teach your child. Our next game will be sight words! Fill a basket or container with all the question-filled eggs.
  3. To play the game, first player rolls the dice and selects an egg that matches the color that was rolled (also a great way to teach colors to younger children!).
    • They answer the question. If they answer the question correctly, they get to keep the egg. If not, the question and egg is put back into the basket.
      She was so excited when it was her turn to open the eggs to reveal the questions!
    • The second player goes next and so forth until all the eggs are gone from the basket. How great is this game for practicing turn-taking!
    • The player with the most eggs in the end wins! In our game, we played non-competitively and we helped each other answer the questions. I pretended not to know the answer to many of the questions to have my daughter teach me how to get the answer.


We also searched the inter-web and gathered a bunch of other ideas to make use of those left-over plastic eggs:

Preschool
  • Color-matching - match the colored egg halves
  • Color-sorting - sort the colored eggs into different containers by color
  • Color-sorting - put small objects like beads or pom poms (we suggest lots of supervision with this one so you can be careful of choking hazards!) into the egg of the corresponding color
  • Alphabet stacking - write the letters on the eggs, stack them in order as you sing the alphabet song, knock down the tower at the end!  You could also make holes in the eggs and string them in order onto pipe cleaners or string to create a cute caterpillar (you can also do this with numbers).

Primary
  • Letter matching - draw capitals & lowercase letters on each half of an egg; match the letters
  • Number matching - draw a number on one side and the corresponding number of dots/shapes on the other; count the dots and match the half to the number (bonus activity: put them in numerical order once you're done)
  • Word families - using word families (words that have the same ending like sit, kit, lit, etc.), write the common ending on one half of the egg (for example, "it") and any letters that could start words with that ending (for example, "s", "k", "l", etc.)
  • Opposites - write words that are opposites on each half of the egg, match the words
  • Sight words - write out words, put them in eggs and have your child choose one to open, read the sight word
  • Spelling - fill each egg with Scrabble or letter tiles (or foam letters) to spell a word, open the egg and have the kids rearrange the letters to spell a word (to make it easier, write out the word on the outside of the egg so they have a guide to follow as they spell).  Make it a scavenger hunt for even more fun!

Junior

Crafts
  • Egg-shaped bath bombs - use the eggs as molds to make your own homemade bath bombs (my daughter loves these and requests them for bathtime often!)
  • Shakers/maracas - fill the eggs with rice & beans and shake away (decorate the outside for more fancy fun...maybe even with a little paper mache fun for the brave among us).  Create a handle using 2 plastic spoons!
  • Painting with eggs (warning: not for the faint at heart) - fill eggs with watery paint and let your child crack it open on top of a canvas or large piece of bristol board to create an abstract painting
  • Grow crystals inside your plastic eggs - coat the eggs with a layer of glue, sprinkle on alum and allow it to dry.  Then soak it in an alum solution for 12 hours to grow gorgeous crystal geodes!

Motor skills
  • Egg toss - toss eggs into various containers.  Pair this up with the matching activities above (match colors by throwing eggs into the matching colored basket, match numbers, etc.)
  • Egg race - just like the one with real eggs, use the plastic ones to race!  Put the egg on a spoon and have your kids balance it as they race across the room (great for gross motor skills and coordination!)

Egg hunt activities
  • Puzzle pieces - hide puzzle pieces in eggs and hide them, collect them all and build the puzzle

Other
  • Easter egg snack or lunch - Use eggs to store different snack foods and put all the eggs in a carton to serve, kind of like we did with an ice cube tray!


Please let us know if you think of any other fun plastic egg activities! And don't forget to tag us on instagram (@smocksandsprinkles).
Saturday 19 March 2016

Rice Krispie Easter Treats

We have a very special announcement to make! It is our one-year blogaversary!!! It's hard to believe how quickly this past year has flown by. We have learned so much and we are so thankful to have so many amazing readers supporting us this past year. Thank you all. We do this blog purely to share our passion with others and it means the world to us to have you follow along in our creative journey. Okay, sorry to get all mushy on you guys, we are just so appreciative to have made it this far. Now onto the topic of this blog post...bunny butts and egg filled nests!
Not going to lie, the plan was just to make some cute *simple* rice krispie bunny butts. Before I knew it I was molding a nest with my bare hands, coating it in chocolate and toasted coconut and sticking it onto a decorated ice-cream cone filled with candy. Why does this ALWAYS happen to me?!
Another confession, I ate allllllll the mini eggs before they even made it into the nest or cone. I am so weak when it comes to mini eggs. What exactly makes them soooooo tasty?! That combination of crunchy candy and melty milk chocolate is deadly. The Cadbury mini egg is officially my achilles heel...or kryptonite. I tried to get away with using mini marshmallows in place of the mini eggs but the type-A perfectionist in me just wouldn't let me get away with that. I ended up packing up both kids in the double stroller and running to the corner store with them to purchase more mini eggs.
These treats look intimidating but they are actually really easy and don't take too long to make. I managed with 2 kids literally hanging off the kitchen counter- gawking and whining the entire time. 

Ingredients
  • Rice Krispie cereal
  • Mini marshmallows (save some for the bunny tail)
  • Butter
  • Vanilla extract
  • White chocolate candy melts (you can buy all kinds of coloured melts at Bulk Barn or Michaels)
  • Green candy melts
  • Toasted shredded coconut (from Bulk Barn) -if you are not a coconut fan, try peanut/other nut crumbs, coloured sugar, sprinkles, cocoa powder even! 
  • Green sugar
  • Coloured sprinkles
  • Plain flat bottom ice-cream cones
  • Lollipop sticks (again from Bulk Barn)
  • Chocolate coated fingers (I found mini "pointers" at dollarama!)
  • Mini eggs
Method

Rice Krispie Base (for both bunny butts and nests)
  1. Follow directions to make the original Rice Krispie treats.
  2. Transfer to a glass bowl and let cool for at least 5 minutes or until you can handle the mixture without it sticking to your hands. It also helps to grease your hands with butter or coconut oil to prevent it from sticking. Using greased hands, mold rice krispie mixture into round balls (approximately 1.5 to 2 inches in diameter). These balls will be the base for both the bunny butts and nests.

Bunny Butts
You can make these on a stick or on a cone or just on their own (ha! That rhymed!).

Bunny Butts on a Stick
  1. Melt white chocolate candy melts (I find candy melts are the easiest to use) according to instructions on package.
  2. Dip end of lollipop stick into melted white chocolate. Push stick into rice krispie ball. Chill for at least 10 min in the fridge to allow sticks to set in place.
  3. Dip chilled balls into melted white chocolate. Allow excess chocolate to drip off. Coat chocolate covered balls in toasted coconut.
  4. Attach "bunny ears" and "tail" using melted white chocolate as the "glue". Let it set.
  5. Coat bunny ears in melted white chocolate and then cover in toasted coconut. Note that I did this step last because it was a last minute decision to coat the bunny ears in chocolate and coconut. I originally planned to leave them plain but decided it was much cuter coated.
Bunny Butts on a Cone
  1. You basically follow the same above instructions above to make the bunny butts, just omit the stick part. You can use a spoon to coat the balls in the melted chocolate and toasted coconut.
  2. Dip the edge of the ice-cream cone in melted green candy melts (I chose green because it looks like the bunny is in "grass") and then into green sugar sprinkles. 
  3. Fill cone with candy of your choice. Pick your child's favourite treat to surprise them! Add some melted green candy melt around the top edge of the cone and "glue" on the rice krispie bunny.
Nests on a Cone (these also look awesome on their own)
  1. Using your thumbs, shape rice krispie ball into a nest. It's best to work with the rice krispie balls while they are still slightly warm.
  2. Coat nest in melted white chocolate melts. Drain off excess chocolate. Toss nest in toasted coconut.
  3. Use melted white chocolate to "glue" on mini eggs.
  4. Dip the edge of the ice-cream cone in candy melt in the colour of your choice (I just used white) and then coat with some fun coloured sprinkles.
  5. Fill cone with candy of your choice. Again, pick your child's favourite treat to surprise them! Add candy melt around the top edge of the cone and "glue" on the rice krispie nest.
You can easily wrap up these adorable treats in plastic bags or cellophane. Be sure to add a cute ribbon. Perfect to give away to guests at your Easter brunch, lunch or dinner!

Enjoy making these tasty Easter treats and remember to share your creations with us on instagram (@smocksandsprinkles)!


Sunday 13 March 2016

Easter Bunny Butt Decor

I have a confession. I am obsessed with bunny butts. Those adorable fluffy cotton balls melt my heart into a puddle of mush. There is nothing like Peter Rabbit's behind...well except for David Beckham's tushie but that's a whole other blog post. The next 3 posts leading up to Easter are dedicated to bunny butts. If you are thinking about hosting a kid's Easter party, bunny butt decor is so easy and cute to whip together.  Here are some ideas to get you started.

Bunny Butt Napkin Rings


Materials 

  • toilet paper rolls
  • felt (your choice of colour)
  • foam sheets (I happened to find foam bunny rabbit shapes at dollarama!)
  • pom poms
  • round make-up sponges 
  • glue (you can use regular glue but I prefer a hot glue gun since I can be very inpatient)
  • scissors
  • tape


Instructions

  1. Cut toilet paper roll in half
  2. Cut felt into a wide strip to cover paper roll. Tape or glue into place.
  3. Glue foam bunny ears to back of make-up sponge and glue pom pom onto the front. Glue completed bunny onto the napkin ring (be sure to cover the felt seam).
  4. Insert napkins and wow your little guests!

yes, that's face paint on my daughter again.

Bunny Butt Place Cards
Glue completed bunny onto a place card (you can make your own by folding rectangular pieces of card stock or stiff paper in half or you can buy a bunch at the dollar store and save yourself the hassle).

Bunny Butt Straws
Glue completed bunny onto a paper straw. You can glue another round make-up sponge or a piece of circular paper as a backing.

Bunny Butt Cups
Cut out foam bunny ears and glue onto cup. Glue on pom pom.

I can't handle the cuteness. I'm pretty sure I was wayyyy more excited than my daughter to drink through a bunny butt straw. Do you have a similar obsession? Please share with us (tag us on instagram @smocksandsprinkles) and get started on your bunny butt decor! Hoppy crafting:)

Saturday 5 March 2016

DIY Bowties for your Little Guy

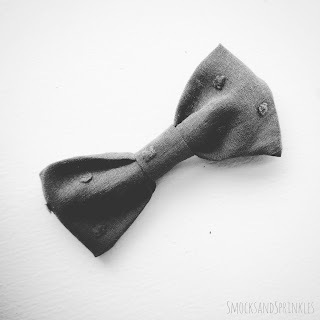
DIY bowtie

Little boys in bowties are the bomb diggity.  Seriously, can you resist them when they look like this?!

little boy's bowtie

Bowties are actually deceptively simple to make!  You can use hot glue to hold it together if you're not going to use it much, or sew it for longevity.  Pair it with some suspenders, a cute button up shirt, and maybe some horn-rimmed glasses?  Save this tutorial for your hipster teenager's prom, too!  You can wear the bowtie by attaching straps, safety-pinning, buttoning etc.  Pssst...if you attach it to a headband base (check out our headband tutorial for measurements in step 13), you can double it as a cute bow hairband, or put it on a clip as a cute hairbow!

bow tutorial

Materials:
  • fabric of your choice
  • hot glue gun & sticks or sewing needle with matching thread 
  • velcro, clip, button or safety pin

Tip!  Use a lightweight cotton material for a crisp, clean look (like my gray bowtie) and easy assembly.  The striped bowtie is made of stretch jersey and was thick and more slouchy looking.  It was also harder to work with when assembling.

Method:
  1. Cut your fabric into 3 pieces as indicated in the image (these measurements are for a toddler bowtie - see the end for the man-size measurements).
    bowtie tutorial
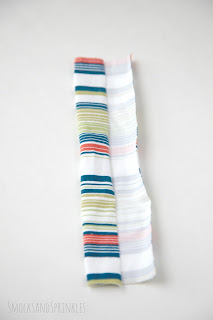
  2. Take the rectangle #1.  This will form the main bow.  Fold one side into the middle.
    bowtie tutorial
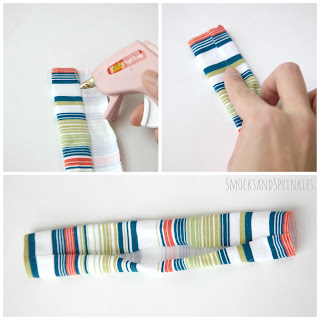
  3. Put a small line of glue at the top and bottom.  Fold the other side in and press into the glue.  You'll notice that the middle is left open.
    bowtie tutorial
  4. Put one dot of glue in the centre and adhere the fabric.
    DIY bowtie
  5. Fold both ends into the centre and put dots of glue to adhere them, overlapping them by about 1/4".  This becomes the main bow part.  Set this aside while you work with the other fabric pieces.
    boy's bowtie
  6. Take the smallest rectangle (#3).  Run a line of glue on the right side (the front, nice side) of the fabric.
    bowtie tutorial
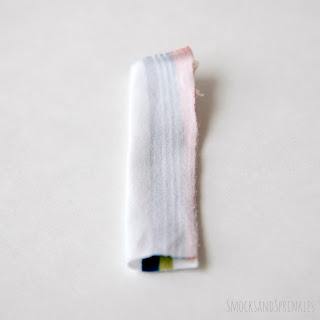
  7. Fold the fabric in half on top of the glue.  Wait a few seconds for the glue to dry.
    bowtie tutorial
  8. Flip this fabric tube inside out.  This will be the middle of your bow.
    bowtie tutorial
  9. Take this piece and wrap it around the middle of your larger bow piece and glue it, scrunching the bow piece.  Hide the raw edges of the bow inside this middle piece.
  10. Optional: I "unrolled" part of the striped bow to make it a little fluffier.  I left the gray one as is.  You can play around with it.
    DIY bowtie

    bowtie tutorial
  11. When you're happy with the creases and bunching in your bow, use hot glue to preserve all the folds.
  12. You can hot glue this bow to a clip, or you can do what I did and attach a safety pin because I'm lazy and didn't want to add any more steps!  I just slipped the pin underneath the center piece and glued it.
    DIY bowtie
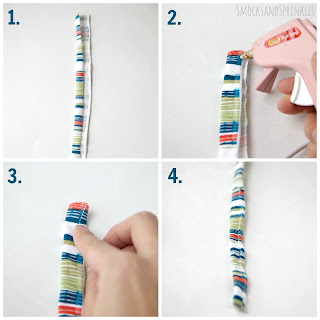
  13. You could also attach it to a strap.  To make the strap, I took the long, skinny fabric piece (#2) and folded in one side.  Applying hot glue in small sections, I folded the other side on top until I had a tube.
    Boy's bowtie
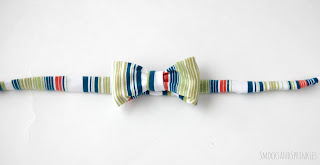
  14. Adhere the bow to the center of the strip using some more hot glue, or string the strip through the middle bow piece.
    boy's bowtie
  15. Attach either a button or velcro (I recommend sewing buttons and velcro) to the ends of the strip so you can close it around your toddler's neck.  If the size isn't quite right, cut the strip to the right size.  If this step is too difficult, you can always tie it at the back, but you'll need to make it slightly longer.
    DIY bowtie
You can also sew a button directly to the bow, so that you can button it straight on a shirt.  Voila, you have the most dapper gentleman you've ever seen!

DIY Bowtie

One of our readers requested measurements for a man-sized bowtie, and I thought it was a great idea so I crafted a large-size one.  She said she wanted to make matching bowties for all the men in her life!  Can you imagine how cute that would be?!  The measurement for the man-size large bow piece is 11" x 4" (21.5cm x 10cm).  The small center piece is 1.6" x 2" (4 cm x 5 cm).  Follow the same directions!  And I say just safety pin it on the big boy.  He can handle himself around pins.  Hopefully?

Be sure to tag us on Instagram (@smocksandsprinkles) so we can see all the cute gentlemen in your life, sporting these easy bowties!

bowtie tutorial
Pin me for later!
Related Posts Plugin for WordPress, Blogger...